Start with a polygon wall in the shape of the firebox and chimney plan. The height should be the height of the firebox opening. The fill should be rubble, assuming stone veneer.

1 Stone polygon wall
Start with a polygon wall in the shape of the firebox and chimney plan. The height should be the height of the firebox opening. The fill should be rubble, assuming stone veneer.
Location: 04 Masonry : Chimney & Fireplace
Just the fire brick part. Looks good in plan, section, and elevation. For a correct section, align the polygon wall of the firebox core with the inside of the Lining object, then subtract the object from the wall.
Images below the fold.
Location: 04 Masonry : Chimney & Fireplace
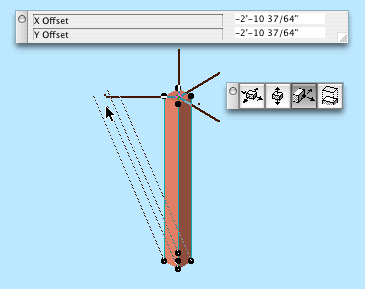
A round or rectangular tube for modeling chimney flues. The top can be offset for a sloping flue.
Plan Display & Editing
"Show Cut" means a white box with a X. "Show Slant" means the path of the sloping flue, typically shown dashed. Both can turned off, in which case the object will be invisible, but the nodes will remain. The cut polygon can represent the top or bottom. The flue size is stretchable by any corner. The top offset can set by stretching the green node.
3D Editing
The offsets and the height can be edited with the green node in 3D.
General use
The idea is to build the flues out individual segments using the object. Use the layer A Flue. Subtract the flue objects from everything they pass through. When subtracting, use "Inherit attributes of operator".
The layer A flue should generally be set to wireframe.
I had a thickness parameter in there, to show the flue material itself at large scales, but I had to take it out because of incompatibility with the smoke chamber object.
UPDATE 3-16-05: Round option. Duh.