I'm still not totally comfortable with the SK routine. For example, if you place the SK title block in the plan, you run into trouble when the SKs overlap. And it's a pain to set the scale when using the title block within PM.

Here's what I'm doing as of now. It probably still can be improved, and as Vassos starts needing revisions I'll probably make further progress. This shouldn't be interpreted as standard right now.

Create a new layout in the SK folder. Use the SK Master, the one without the title block. Name the layout what you what to print on the SK. The autotext in the title block object will render the layout name.

Set up the title block in the AC detail window with the date, sheet ref and scale. Import the 'xSK Title' view into the layout. (Not the Master Layout.) Tip: In the Navigator, copy the title block drawing from the 'SK Blank + Title' Master. (Drag while holding Option.) Make sure you update it.

Select the title block drawing and explode it. That turns it into 2D elements. When you change the title block in AC later, this layout won't care.

Import the relevant view(s) to the SK layout. Tip: Copy the views from wherever in the set they live, and update.

Interlude: Drag-copying in the Navigator. You can easily move drawings between layouts by dragging them in the Navigator. If you hold down Option while doing so, you will make a copy. You can be sure you are copying rather than moving when you see the green plus-sign circle.

Once the drawings are in place, go to drawing usage, select them, and click 'Break Link'. This basically turns them into PMKs that are embedded in the layout book. In drawing usage their status will read 'Embedded'. When the views from which the drawings came are updated, these PMKs will be untouched.

The combination of exploding the title block and breaking the views' links means that the SK layout will stay as it is, whatever else changes in the project and layout book.

The SK thing is a tricky area, since AC and PM are not naturally inclined towards revision control in their current state.
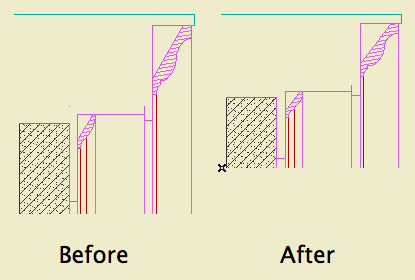
With the detail tool and a well-developed model, trim details can be developed pretty quickly. The oddball is rakes, since there's no way to cut a non-plumb section. You need to take extra steps to correct the distortion arising from cutting through sloped elements. A conventional resize won't work, because you can't restrict it to one axis.

The trick is to create a patch and then adjust its vertical dimension.


The goal.

1. Marquee the area you want in the detail and create a patch.

2. Figure out the conversion factor. There's at least two ways to do this, I like the first one.

a. SIN(90-RoofSlope). Example: 10/12 pitch is 39.8056ยบ. SIN(50.194)=0.7683.

b. (True thickness of roof) divided by (plumb cut height of roof). These values are readily available in the info box. Example: A 10" roof at 10/12 pitch has a plumb height of 13.017". 10.0/13.017=0.7683. Tip: Much easier if your working units are decimal.

Four decimal places is fine. If the factor is greater than one you've made a mistake.

3. Now you can either a) drop one line into the patch's 2D script, or b) calculate the adjusted height of the patch and change it in the settings.

3a. Open the patch object. At the top of the 2D Script type:

MUL2 1, [ConversionFactorFromAbove]

For the 10/12 pitch, that's:

MUL2 1, 0.7683

Save the object.

3b. Multiply the 'natural' height of the patch by the conversion factor. Select the patch, and put the converted height in the Y field.

Either way, you're squeezing the patch so the vertical dimensions of the elements are right again. Horizontal is unchanged.

4. Create a detail. I recommend an independent detail, since the source view data for a detail generated from the window will never be right; it will be pre-patch distorted, and you'll have to delete all of it.

5. Place the patch object in the detail window. Tip: Cut and paste it from the section window. You don't want it hanging around the section anyway.

6. Select the patch and explode it (Cmd+=). Now you have 2D lines and fills as if you had generated the detail directly. Except: All the elements are of one big group. Also, there's an 'Air Space' fill element in the shape of the patch, which you don't need.

You can trash the patch from the library if you wish. It is no longer needed. On the other hand, it doesn't take up much space. Whichever.