SK sheets are the official format for issuing corrections, clarifications, changes, and other additional information after the construction set is issued. SKs become part of the construction documents, and should created and maintained with the same care as the big sheets.

Use an SK sheet whenever you have to issue document information between official revisions. Revision sets should be updated to include the SK information since the last issue. For geometry taken directly from the model, this will take care of itself via the traditional view updating process. Scanned drawings and other non-project-file info must be placed on an appropriate big sheet, in addition to the SK layout, so the next revision is complete.

We have developed a special title block for a letter size sheet, Title Block SK RND81. It enables you easily to create an SK sheet out of any geometry in the project.

The preferred method of putting out SKs is PlotMaker, using special layouts within the main CDs layout book. The layout book will automatically number the SKs as they are created, and keep them in one place for safety and organization. You can also import scanned drawings into the layouts, so that hand drawings can be maintained consistently with the rest of the documents.

It is possible to simply place a SK Title Block in ArchiCAD, marquee the SK, and print the marquee area. While this method is quick, it does not create a permanent copy of the output, nor does it maintain your numbering. In addition, printing from ArchiCAD does not have the same quality as printing from PM, since the colored pens have to be turned grey.

See also:
Title Block SK RND81
Getting the SK Layout Tools into Current Projects
Location: 01 General/1 Graphic Symbols/

Description: A mask, frame, and title block for generating SK revision/clarification drawings.

Parameters:

• Sketch Title: Can be entered, or can take the layout name in PM
• Scale: Use ArchiCAD scale, 'no scale', or custom text.
• SK number: May (should) be omitted for automatic generation in PM
• Sheet Reference (optional)
• Project Name
• Issue Date, Past issue dates, and the ability to remember past dates.

Features:

• Interior mask with optional frame, for isolating the drawing part you need. The frame area can be drawn as the object is placed using the Box or Rotated Box methods of the Object tool. The mask can be removed, maxing out the available paper area, by stretching the mask to its maximum size. Note: The masked area will always be centered on the sheet.

• Check the 'Today' box to put today's date in the date fields. If there is a previous issue date, it will be bumped down the list. Or,

• Set the date manually and then check the 'Store Custom Date' box, which also retains the previous dates.

(Note: Both of these checkboxes are designed to uncheck themselves once they have done their work. Don't check them again!)

• The date saving is controlled by the 'Remember Dates' box, and can be turned off.

Use:

• Place in ArchiCAD. Set the SK number to 'Auto in PlotMaker'. Place Hotspots at the corners. Save a view of the sketch area. Import this view into PM, using a layout linked to the 'SK' Master. Print the layout from PM.

• Place in ArchiCAD. Marquee the object, snapping to the corners of the white space. Print, using the 'Marquee Area' option. For this option, you must set the SK number manually. This method is not recommended, since the SK number isn't generated automatically, and the SK isn't saved.

• Scan a hand drawing or other image. Create a layout in PM, using the 'SK Blank + Title' Master.

Place the object and its hotspots on the layer '+Z SK Title'. This layer is hidden and unlocked in all layer combinations. Before placing the object, set the layers/view to one of the output LCs. (E.g., A1) Then either turn on the '+Z SK Title' layer manually, or set the object tool to the layer and click 'show layer' in the 'layer is hidden' dialog box. Save the view with the layers as they are. It isn't a layer combination, but the view won't care. The alternative is to create LCs for every output LC plus the SK Title layer. Too much.

Very Important Note: The object must be brought to front. You might also have to send something back a step to get it hidden. There is no way to automate this. Sorry.

See also:
Sketch Revisions (SKs)
Getting the SK Layout Tools into Current Projects

The layer for the SK Title Block. It has to be kept out of the way when you're not using it.

This layer is unusual in that it is hidden and unlocked in every output layer combination. There are no LCs of the form, A1 Floor Plan SK, A2 SED SK, etc. Since you might output an SK from any LC you would use for a CD drawing, we would need an SK LC for every current output LC. That's too many LCs for such a narrow purpose.

In practice, when preparing an SK, select the output view from the CDs viewset, then flip the SK Title layer on. (You can do this in the layer dialog, but I think it's faster to pick the layer in the info box, then respond to the 'that layer is hidden dialog after the first click.) Once you do this, you're no longer in an LC, but this doesn't matter when saving the view.

The zTemplate folder has been updated to accommodate the new SK layout tools. If you need to issue SKs for current projects, you should bring the stuff in.

In AC:

1. Create an independent detail window with the ID 'xSK Block'. The name can be blank. Set the scale of the window to 1.

2. Place a 'Title Block SK RND81' object in the window. Place hotspots at the corners of the white space.

3. Save a view of the window in the #2 CDs viewset, Notes folder.

Note: This view is used in PM to generate SKs where the imported drawing does not have the SK title block in it, such as a scanned image.

4. To place SKs in plan or section windows, you need to create the layer '+Z SK Title'. (Everything in that article is true, except the misleading parts. This new layer should be hidden and unlocked in every LC, which is what happens naturally, except for the LC selected when the layer is created. After creating the layer, hide it in the current LC and click update.)

In PM:

1. In the Tree By Subsets view of the Navigator, right-click on the layout book name and pick 'Create New Subset'. Call the subset 'SK'.

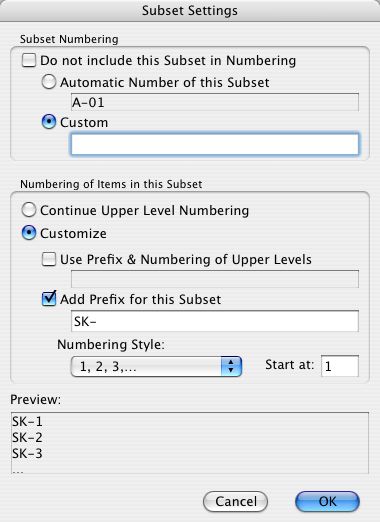
2. Right-click the SK folder and pick 'Subset Settings'. Make the box look like this:


Subset Settings, really just auto-numbering setup.

3. File | Import. Navigate to 3 Resources>SK>SK Layouts.lbk. In the Import dialog, check the box next to the layout book name, all the way at the top. This means you will import everything. Click 'Import'.

4. You should get two master layouts, 'SK' and 'SK Empty + Title', and one regular layout 'SK Sample'. Move the 'SK Sample' layout into the 'SK' folder. With the 'SK Sample' layout selected, check the settings at the bottom to make sure it's linked to the 'SK' master.

As you need new SK sheets, you will need to create new SK layouts and link them to the appropriate master. If the SK comes from ArchiCAD with a title block, use the 'SK' master. If you are importing a drawing without a title block, use the 'SK Empty + Title' master. SKs of both types should be kept in the SK folder, in the order they are created, so they number themselves properly.

See also:
Sketch Revisions (SKs)
Title Block SK RND81