A Flue is for modeling chimney flues. It shows in plan and section. In section, the layer should be wireframe to show the flue void. In general use, elements on the A Flue layer will be subtracted from each part of the Fireplace/Chimney. The templates have a new layer combination, 'View Flues', which shows the flues solid inside the wireframe chimney.

A Chimney3 is for chimney parts that should not show in plan. Formerly we used A Wall Hi for this purpose. Putting these elements on their own layer allows you to show an axonometric of just the chimney. The templates have a new layer combination, 'View Chimney', which shows the chimney solid by itself. You can use a marquee to create a cutaway axon to show the flues.
Elevate, v. syn: lift, hoist, raise, pull up...

Now that you have a fireplace, you'll likely need a chimney.

More...

Location: 04 Masonry : Chimney & Fireplace

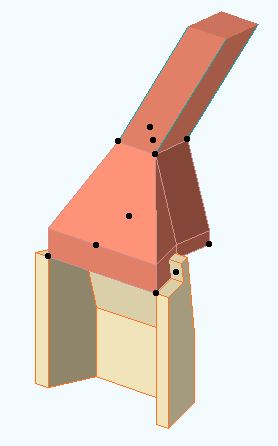
The missing link between Firebox JM9 and Flue JM9. You could use a mesh and a slab in its place, but why?

The smoke chamber fits on top of the firebox. The width, depth, and firebox Back width should match the Firebox Lining object. The flue width and depth should match the Flue object. The front of the flue lines up with the back of the firebox. You can't change this.

The throat height is the distance from the top of the firebox to the start of the smoke chamber slope. The shelf depth is the distance from the slope start point down to the bottom of the smoke shelf, behind the firebox. The throat adjustment is for hiding the edge of the smoke shelf inside the top of the Firebox Lining. (Very easy to see in section image below the fold.)

The object should be placed on the layer A Flue. Model it with a visible, white-printing pen such as 40. For the material, use the material you want to see inside the flue. The Flue Pen should be a printing pen, to show the start of the flue above.

More images below the fold.

More...