On Land

Environment Information
At Rill & Decker Architects we run ArchiCAD on Mac OS X. If you work at Rill & Decker, this is your stuff. If you don't, but you work in ArchiCAD, you may find something interesting. Anybody else, I don't know.
RSS
Objects Archive

« Newer | All Entries | 1 | 2 | 3 | 4 | 5 | 6 | 7 | 8 | 9 | 10 | 11 | 12 | Older »

BORING!

(Did you know April is national sheet setup month?)

I've modified the drawing area object. Whee! It is simpler, clearer, and just a bit more spacious. It also allows you to disregard the grid in PlotMaker, which allowed me to cut the layout book templates from 5 to 2.

The rectangle is the available drawing area. The ticks on the corners line up with the title block, and set a 3/16" margin around the sheet. Alignment hotspots should be placed on these ticks. The ticks along the edges at each corner are for aligning plan dimensions.

Note: This is superseded in AC10 by Sheet Area RND10.

Note: Superseded in AC10 by this.

Location: 01 General / 3 Drawing Tools

You can't do a detail grid without it. Put in your sheet size. The object knows how big a grid cell is, and how many are on a sheet. Arrow-stretch the object around big details; it will snap to the next size up. At the maximum size it will show the actual grid. This is to place in a master layout to assist drawing the grid in PM.

You must place hotspots at the corners to detect them in PM.

There are guide points for placing the note column, and the note column width can be adjusted. There is an anchor point for the drawing title. The drawing title should extend to the right note margin. Don't adjust the margin or the drawing title elevation unless you have to.

There are detectable points at the midpoint of each side to help with alignment with other details. In addition, there is an editable alignment point with a numeric index of eighths of an inch. Align one detail to a given index, then use that index to align the adjacent ones.

Now that you've fully realized the potential of the current windows and doors, please let me know what you'd like them to do.

This isn't something that will happen overnight; I'm thinking a 6-12 month timeframe, very likely coinciding with ArchiCAD 9. I am only doing the groundwork for the next version, but now is the time to build in big changes. So speak up!

For all JAM8 windows, I have added the ability to extend the masonry sill past the masonry opening. The parameter is called 'Sill Bearing'. The default is zero.

It's about time. I was getting ready to ask what features people want in the next version of the doors and windows (Thinking very far ahead), when I realized there isn't a comprehensive list of the current features, which are extensive. So here.

More»

Location: 09 Finishes

A slate (or whatever) surround with optional moulding. Actually the slate is optional too, you can have just the moulding. You can set the head and jamb widths separately.

PS, right-click on this object in the plan and select 'Go to Info Web Page'. Watch out for recursion!

Location: 01 General : 1 Graphic Symbols.

I have added an option to Opening Slash JAM8 to show an X instead of a single slash, for showing areas open to below. The slash mode is the default.

Location: 06 Wood & Plastic : Structure.

TrusJoist has updated their product line. The TJI model numbers which end in '50' are being phased out. You should stop using them immediately. You should modify the structure plans of any current project not under construction.

I have updated the objects which contain TJI specs with the new model data. The old numbers are still available, but they are moved aside with a reminder to not use them.

I have updated all (I think) the objects for structural beams and such, so that the 3D model can be turned off.

This enables you to put all the beams on the layer S Beam, rather than putting the ones you want to be 2D only on +S Struct Note.

It's neater and more consistent this way.

The effected objects are:
Steel W Shape Beam JAM8
Steel Tube Shape JAM8
Steel Angle JAM8
Wood Beam JAM8
Wood Header JAM8
Hip Valley JAM8

If you run into others that need this treatment let me know.

Location: 05 Metals

A steel pipe column. Pretty simple.

Why use it instead of an actual column? Because columns are evil. Not really. Columns are evil, because they interfere with walls and allow walls to interfere with them. But the reason to use the object is so you can still show the column solid when you set the construction fills' display option to 'Empty'.

Trust me. I'm going to get all this structure plan stuff pulled together real soon.

Location: 06 Wood & Plastic / Trim & Moulding

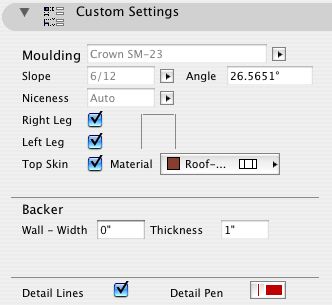
The shed crown now works better when used as a rake, at the top of a roof. You can turn on the 'Top Skin' to cover the lines at the back of the rake. In doing so it covers the roof itself. Select the skin material accordingly.

The purpose is to improve the appearance in elevation. When creating the roof plan, you should still image the roof itself.

Remember to trim (base) the object to the parent roof, or the top line of the shed will not show.


Shed Crown Settings

Location: 01 General : 3 Drawing Tools.

To use in conjunction with grade cutting with SEOs. A U- shaped white stripe which masks the bottom and sides of the mesh in the section. The right end height is the height of the object, and the left-end height is set with an editing hotspot.

More»

« Newer | All Entries | 1 | 2 | 3 | 4 | 5 | 6 | 7 | 8 | 9 | 10 | 11 | 12 | Older »