Why?
1. Maybe you want to email it somewhere (like home).
2. Smaller files are more reliable. Less chance of corruption.
3. They save and open faster.
How?
Why?
1. Maybe you want to email it somewhere (like home).
2. Smaller files are more reliable. Less chance of corruption.
3. They save and open faster.
How?
OK I should have done the foundation stuff in the meeting today because it would have given me the opportunity to demonstrate polygon editing for walls, lines, etc.
You can't place a detail marker in a detail window. Rats.
You can change the linked drawing of a placed marker by opening the settings and clicking 'Browse' underneath the detail name.
I've updated the other post with this info.
On the ArchiCAD Help Menu, beneath the first two items, you will find two lists of items.
The first list consists of links to PDFs, including the ArchiCAD manuals. The PDFs reside in the Documentation folder within the ArchiCAD folder. Any PDF placed in this folder will appear in the menu.
The second consists of links to web sites. The links reside in the WWWLinks folder within the ArchiCAD folder. Any link placed in this folder will appear in the menu.
What it does:
• Limits the area for a Find & Select.
• Limits the area for a Select All, or a tool-specific Select All.
• Limits the model displayed in the 3D window.
• Marquee-stretches. Elements wholly within are dragged, elements partly within are stretched. Groups off!
• Limits the elements to save as a module. With heavy marquee, makes it possible to save a multi-story module.
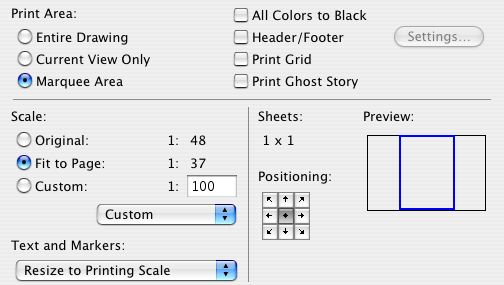
• Limits the print area, instead of resizing the window.
• Makes it possible to show section perspectives.
Remember that with a marquee placed, everything in side the marquee is selected for any purpose other than changing settings. All the transformations and copy transformations will work. Delete will work. Eek!
See Also:
ArchiCAD 10 Reference Guide pg. 56
Some are redundant. I will probably think of more.
• Use the 'Working Dims Plan' Layer combination.
• Option+click on existing strings to maintain witness line justification as you move in.
• To add one string's ticks to another, select the string to keep and Cmd+click on the string with the points to add.
• Use the arbitrary angle setting when dimensioning walls, for auto-orientation.
• Use the 'place, rotate, drop' construction method with the CL object.
• To graphically justify a group of witness lines: Select the ticks. With the dimension tool, click on the segment and drag it to the desired justification point. Useful for backing up a few witness lines where the plan is very near.
• When you select a tick, the element the tick is connected to will briefly show as selected. To maintain this effect long enough to actually observe it, hold the mouse button down on the tick.
• Ticks can accumulate at a single point. If you try to delete a tick and it stays put, keep trying.
See also:
Dimensioning, General Principles
You have clicked some points for your dimension string. You have not checked the geometry method for the correct orientation, horizontal or vertical. Well over half the time, due to Murphy's Law, the wrong one is selected. You click to place the string, and get nothing. You have to start over. You are sad.
If you are dimensioning walls, you should be clicking on the line of the wall, rather than the corner, in order to dimension the core. (This isn't the tip; it is current standard practice. I hope someone is praying for you if you aren't dimensioning this way.) Choose the third, arbitrary angle, geometry method. With this setting, the string is forced to orient perpendicular to the wall, regardless of the wall's direction.
For two strings with the same orientation, select one, then Cmd+click on the other. The second string will disappear, and its points will be added to the selected string.
Forgot something else...
In 8.1, we have the option of placing a marquee to limit the print area, instead of fiddling with the window itself.

Click 'Copies and Pages' and select 'ArchiCAD' to view these options.
As far as I know, this option has always existed, but I've only fully internalized it recently.
Try this display option in your working plans and sections views:

It causes walls in plan, and all elements in section, to display as solid fill of the pen of the fill pattern. In plan, this means that only the corner of the wall itself can be detected, not the inside drywall corner. This eliminates the problem of accidentally aligning counters, floor fills, and such to the core of a stud wall.
I have taken the liberty of changing the working views in the templates to employ this option.
This is about four years old but I wanted to explicitly point it out...
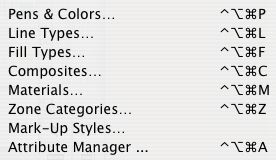
All the attribute-related options on the Options menu (Pens and Colors, Line Types, etc.) use the Ctrl+Opt+Cmd modifier combination with the initial letter of the attribute.


Update: A couple of these (notably materials and composites) broke in AC9 due to conflicts with default shortcuts in OS X. Pens and fills still work. Keep the Attributes toolbar on.
Update: For AC10 I put the quick layers commands in the main toolbar, so you don't need the palette.
Window | Floating Palettes | Show Quick Layers (Ctrl+L).

The Quick Layers palette enables you to:
Unhelpfully:
• Toggle the display of all the layers. All the showing layers become hidden, all the hidden layers show. Shrug.
• Ditto for lock/unlock. Shrug.
Very helpfully, under 'Selection's Layer':
• Hide, lock, or unlock the layer of selected elements, even for multiple layers at a time. Similar to the 'Layer' sub-context menu.

Unhelpfully again:
� Hide or lock all layers. Big shrug.
The palette will close when you quit ArchiCAD, unlike the standard palettes. Just reactivate it when you start with Ctrl+L.