
On, well, land. Site model roundup. Very lightly updated alongside the Mesh post.
Ideally, you have a DWG of the boundary and topological data from a surveyor. Less ideally, you have a scanned image of the data in PDF or some image format. Either way, drop the file into Archicad and create your 2D site geometry from it. If you are working from raster (bitmap (non-CAD)) data, you will need to precisely enter the boundaries as you draw.
Everything about the mesh tool has already been said.
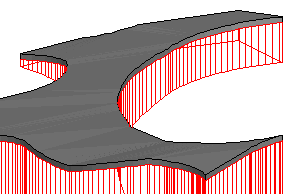
The mesh polygon should at least meet the property boundaries. On a small site you may want to show more.
Mesh contours will generally correspond to topological contours. You can magic-wand mesh contours onto your 2D site geometry, but be sure to use 'No Surface Fitting'. See the mesh post.
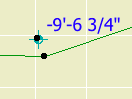
If you have topo data which refers to sea level, it is much easier to enter contour elevations relative to it.
For an addition project, you might not have topo data. In this case you need to approximate the grade elevations based on the existing structure. Such points should be entered relative to project zero instead of sea level.
The default elevation of the grade mesh should be zero. Once the mesh is completed, you can raise and lower the mesh as you like. Point elevations will be entered relative to project zero or sea level, so the position of the reference plane is not critical.
If there are existing structures on the site, you may have to add some individual points or extra contours so the mesh meets these features cleanly.
The thickness of the mesh needs to be greater than the lowest point of the mesh top. If the mesh is at project zero and the lowest contour is twenty feet below that, the mesh thickness needs to be at least twenty feet.
There are two site mesh layers, L Grade and L Grade.E, for the existing and new grading respectively. I recommend creating the mesh on the existing layer and then making a copy on the new layer. The new one will show in project views, while the existing one acts as a backup. Therefore, first thing when you finish the mesh, make a copy and change the layer.
A note on these layers in the context of Renovation. Most .E (and .D, demo) layers went away with Archicad 15, but I've kept this one so that New Home projects can be executed without the need for renovation filters. On a new project, generally nothing is existing except the site. I might change my mind about this, but it's not a pressing issue.

Since it's narrow, the driveway will probably only have edge nodes. Some of these nodes will coincide with the grade mesh contours, and these can be entered relative to sea level. Some coincide with building elements, and you might prefer entering those relative to project zero.
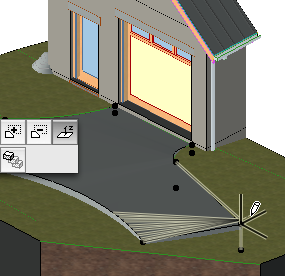
Excavation of the site is done with solid element operations. A hole cut in the mesh polygon goes all the way through, which is too far. Always cut the site with dedicated elements on the X Site Cutting layer, not with the building elements themselves. This makes the solid ops simpler and more stable. The driveway is an exception to this rule, and it's OK to cut the mesh with a few other site elements such as swimming pools. The important thing is to not get carried away; fewer operators means more stability.
We have a layer combination, x Site Cutting, which shows only the land, driveway, and site cutting elements. This makes it easier to do and redo the site subtractions.
To change the finish grade, move the existing contours of the mesh. You have to do this one node at a time. When you move contour points, be careful not to cross other contours. Like with an existing structure, you might need to add points at corners, terraces, etc. Make sure the elevation of such points is between the elevations of adjacent contours.
Moving a contour 'uphill' lowers the area it came from. Moving a contour 'downhill' raises the area it came from.

You may find it helpful to draw the new 2D contours first, extrapolating the new grading from critical points and connecting the dots the old fashioned way. Then just line up the mesh contours with the 2D contours. Or sculpt the mesh directly and then draw the 2D contours onto it.
There is one special issue with the grade mesh in section, the cut fill pattern.
In our standards, the earth fill pattern is shown in wall sections but is hidden in building sections. We use a pen set trick to manage the switch. The grade mesh should use the cut fill pattern 'Earth'. The fill pattern pen should be number 37. (Note that most pattern pen numbers end in 1.) In the normal '*Layout' pen set, this pen is white, so the pattern is invisible. In the 'Layout Wall Section' pen set, the pen is black and has the same light weight as an 11, 21, or 31 pen.
The mesh's cut pen should be number 36. This is one step heavier than our usual cut pens, whose number end in 5. The ground line in sections is thus heavier than other element cuts.
Here's some helpful links posted at Archicad Talk.