On Land

Environment Information
At Rill Architects we run Archicad on macOS. If you work at Rill, this is your stuff. If you don't, but you work in Archicad, you may find something interesting. Anybody else, I don't know.
RSS

Location: 01 General / 1 Graphic Symbols

Shape Tag
A shape with a text block in it. While working on the labels in 19 post, I realized I had never posted the recent updates or the label version.

The shapes are square, rectangle, triangle, circle, ellipse, oval, diamond, hexagon, pointed box, and roundrect. The roundrect has authentic iOS proportions.

The rectangle, oval, hexagon, and roundrect will elongate to accommodate the text, if the Stretch for Text parameter is on. The square will turn into a rectangle.

The Height parameter refers to the vertical dimension. The Length Factor parameter is multiplied by the height to get the length of the rectangle, ellipse, oval, and roundrect shapes. If Stretch for Text is on, the length is overridden by the text length.

The text, by default, is the global ID of the object. You can also choose to enter a custom text.

The size of the text can be set by points, millimeters, or as a fraction of the shape height. All these parameters are hooked together, so when you switch among them the actual height stays the same.

There is a value list for the font, and you can enter any font name. The text can be shown bold, italic, underlined, or any combination.

The Mask parameter will make the shape opaque white, using the 'Solid' Fill and White Pen parameters.

The Shape Label is simply a label version of the same thing. When placed as an associated label, the ID displayed is that of the labeled element. Placed independently, you need custom text.

Download here.

Archicad 19 brings substantial changes to the label tool. Labels are a key component of automatic annotation, so improvements are always welcome.

The biggest change is multiple labels on a single element in a given viewpoint. Since you can place more than one label, the Label Elements checkbox is illogical and has been removed. Therefore, the per-element-type pre-setup of the label tool has also been removed. To label an element, set up the tool like you would any other, and click on the element.

Labels can be associated or independent. For labels this is considered part of the geometry method, though the G shortcut doesn't work. This isn't new, but let's review.

Independent labels are often text, but they don't have to be. Many of the labels in the label chooser are meant to be associated and will display nothing, or nothing useful, or a warning about being unavailable for independent labels.

Associated labels move when the element is moved, and can display information about the element. There are new labels in the Archicad library designed to display many kinds of element properties. Take a look at General Label 19 to see some of the possibilities. Associated labels can also be text.

Expect more kinds of labels. Expect to place more labels. Expect more label favorites.

There's an inverted pointer option for ceilings in section.

They added a 'Simple' and 'Detailed' option to the geometry method. Simple places the label with one click, with the default pointer shape. Detailed lets you draw the pointer with three clicks. Detailed will be the right choice for us in almost every case; they could have left this feature out.

There is a new button to turn the pointer off and on. It's a big improvement on the old, very counter-intuitive, 'Use symbol arrow' checkbox. You can turn off the pointer for any label, including text. So you can have a bare text element that's actually a label.

There is a pre-selection highlight on label-able elements with the label tool active. (The level dimension tool has the same thing.) Cmd+tab works as you would expect to cycle through a stack of elements.

A lot of the new labels in the Archicad library are proof-of-concept. You can easily call out the composite of a wall, but is that composite name suitable for output annotation? Informing the user and informing the builder are not the same thing. It will take time to work through these issues. I would like to automatically label more things. In the future, everything will be automatically labeled, but this is not the future.

This is a big update to labels, but there are still frustrating limitations that we will be stuck with until the next big update.

The settings dialog has a graphical chooser that's more like the object tool, but it still doesn't show you the folders. A digression:

When a library part is superseded by a new version, I move the old one to an "xOld" folder outside the normal category folders. The xOld folder is in the loaded libraries. This means placed instances of the old object continue to work, but when you look in the category folder, you see the new one. If you're using an object and you notice it's in the xOld folder, that tells you there's a new version. But some tools (the markers, all of them) don't show you the folders, so all the parts are piled into one dumb list. So I can't sort-of hide old labels and markers from the user.

The only material improvement in the new label chooser is the appearance of preview image icons, which, I guess is sort of nice? But they should have just had it match the typical library parts. And because labels are a bigger deal now, there will be more of them, in a longer and longer dumb list.

Another disappointment is the lack of an option to align the pointer with the vertical center of the top or bottom line of text in a multi-line label. And you still can't work around this with GDL, because the scripted symbol is automatically shifted according to the pointer alignment. This is graphically bad, but I am very near throwing in the towel and aligning all labels to the middle. If they didn't fix it in this update, they're never going to fix it. Sometimes you have to smooth the workflow at the expense of graphic standards. Which is a whole topic on its own.

They fixed the, let's call it, mirrored placement bug. But actual mirroring is still wrong. At least now the ghost bounding box shows you what's actually going to happen, even though it's not what you want. (Only the angled part of the pointer is mirrored.)

They made it impossible to accurately place a pointerless associated label on the first try. Example: Door or window tag in section/elevation. But that is probably a bug.

If there is another big update to labels, the next thing to wish for is placing a detail marker as an associated label.

These guidelines are current as of Archicad 19.

More»

When dimensioning, strive for stunning, perfect, complete, beautiful clarity. I'm serious.

More»

My view of the template is this: Anything you always, or even usually, do on a project should be started in the template. Stories, sections, elevations. Views, lots and lots of views. Not just some layouts, almost all the layouts. You're going to publish PDF and DWG. You're going to print. You're going to do sketch render and BIMx. And if you don't, so what. It's easier to delete or ignore the extraneous items than to create new ones. You don't want to create a layout book, with proper auto-numbering subsets, in every project. The favorites mean the tools are ready to go.

Let's call this the inner template. It is just the PLN file.

There's other stuff: The outer template. What these items have in common is that they are present in every project (so they should be in the template file), but they are also company standards that may change slightly over time (so they should be centrally maintained). Paradoxical!

These items use four different techniques driven by how they are used and maintained:

• Text document PDF placed as a drawing element in a layout.

• 2D modules hotlinked in detail viewpoints.

• One-story PLN hotlinked in the floor plan.

• External views placed as drawings in a layout.

General Notes

We call them that because they are notes, that are general. Are they specific? No, obviously. We maintain PDFs of general notes for all the jurisdictions we typically work in. The PDF pages are placed as drawings in a layout. The template default jurisdiction is Montgomery County, MD. If you are working in DC, use Link Drawing To to switch to that PDF. All the PDFs are in one folder on the server.

When we learn of a new or changed requirement of a certain jurisdiction, or a better standard practice we want to implement, we modify the notes document (in Word), and re-save the PDF. Projects using that document can then update the placed drawings and the notes are always current.

Again, these are *general* notes, with no project-specific information. All the running projects should have current general notes. Specifications and project-specific notes go elsewhere.

The standard abbreviations are handled by a similar linked PDF strategy.
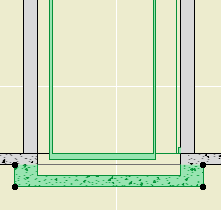
Standard Details

These are technical details with no architectural ("aesthetic") content. Mostly they talk about wall types, roof assemblies, flashing, etc. If the project has slate roof, regardless of the eave design, the documents should have a standard detail showing how a slate roof is done.

Such details are placed as hotlinked modules in detail viewpoints. The template contains some of the more common ones, and others can be hotlinked or merged as needed.

The shared details themselves are in a PLN file, with one detail on each story. Doing it this way lets you publish the modules all at once with a publisher set.

So, you start a project, and though you are in schematic design, there are already standard assembly details in the project. Like with the standard notes, if we decide to make an improvement to a standard detail, we can re-publish that detail and all the projects using it can update the hotlinks and be up to date.

On the other hand, if you want to modify a wall type for the specific project, you can break the hotlink, and modify the detail as needed. When a new detail is developed in a project, it should be brought into the details PLN and published as a module so it's usable in the future.

By providing hotlinked details in the template, we have some standard details done, as well as a head start on modifications we might need for the project.

Electrical Symbols

Update: I think a proper Electrical Symbols Schedule is better.

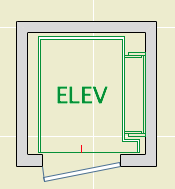
The electrical symbol legend is a hotlinked PLN file (not a module; it's just one story) placed in the template's floor plan on story number -2, a non-publishing story below the Basement (-1). There is a view saved of the legend, which is placed as a drawing on the electrical sheet layouts.

The legend can't be placed in a detail or worksheet viewpoint, because some of the symbols are lamp elements, which can't be placed in details. (The rest are objects.)

The legend itself is handy for doing electrical plans: Set the trace reference to that Footings story, and you can eyedropper (Opt+click) on the symbols.

Again, the legend is standard in the template when the project begins. If the 'master' legend is updated, the hotlink manager will alert the user. OTOH, if the user wants to break the link and modify the legend, they can do that.

Drawing Symbols and Standard Fills

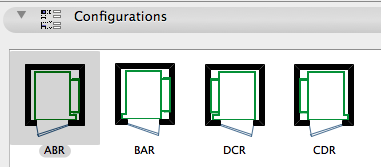
On the cover sheets we have legends for drawing symbols, section fills, and surface fills. These are external views from a PLN file, placed as drawings on the two (Sizes D and E) cover sheet master layouts. (We use size C internally and for preliminary work, but never for official submissions or CDs. So no cover sheet with the legends.)

Because the sheets are different sizes the legends are as well, and there are separate views for each sheet size. The Drawing Symbols.PLN file has four stories.

The symbols and the section fills are published at 1:1 scale, so those two legends can be next to each other on one story. The surface fills are "Model Size", so they have to be published at an architectural scale (1:48) in order to show anything in the tiny boxes of the legend. They have their own story.

Two stories for E size, two for D. The four stories are saved as views with the appropriate 1:1 or 1:48 scale.

These legends rarely change, but when they do, the placed drawings can be updated.

Elevator Plan

Location: 14 Conveying Systems /

This is a hydraulic residential elevator based on a product line of a real company. Since I don't know how they feel about me 'using' their 'IP', I'm not saying who it is at this time. You could probably figure it out.

Because it's a real product line, there are limited size and configuration options. Under Cab Size there are three. Under Door Configuration there are various. Some of the door configurations offer the option to have the door hinge from the 'Track' side of the elevator or the 'Opposite' side. If this parameter doesn't apply, it is hidden.

You can choose the configuration visually under the 'Configurations' interface tab.

Elevator Chooser

There is a read-only Configuration Code which is generated from the Door Configuration and the Hinge Side. This is from the product catalog.

I have provided a Standard Sizes parameter which locks the length and width to the catalog data. I wouldn't turn this off; I would rather know how big the real equipment is. The only case where I would turn it off is where I was using another manufacturer and the configurations were similar but the exact dimensions were different. Anyway, it's stretchable in principle, but the default is to be locked to the standard sizes. Turn this switch off and stretch to any impossible shape you want, YMMV.

Place the object on the bottom story of the elevator's true extent. Show the object on All Stories. Set the object's Stories Served parameter to reflect the number of actual stories the elevator will serve. The 2D symbol will not be shown above or below this range. (Though (Archicad fail) the object will still be selectable via Select All on stories where it is not visible.) The wall track which supports the cab will automatically extend through all but the top story being served by the elevator. The top story is covered by the value in the Top Rail Height parameter. This value should be roughly the top story's ceiling height. (I found in most cases that the track was too tall if it ran the whole top story.)

The Raise Cab parameter determines how many stories the cab will be raised in 3D from the home (bottom) story. This would only matter if you cut a section through the elevator shaft, and frankly it wouldn't matter much even then.

Elevator Pit
Pit.
If the Pit Depth parameter is non-zero, the object will build the pit below the elevator. You can set the thickness of the walls and floor of the pit. You still need to cut a hole in the surrounding slab. The pit will be placed under that slab, using the Surrounding Slab Thickness parameter.

In plan, it looks like an elevator. The length and width dimensions are based on the finished dimensions of the shaft. The text bit should center in the car and it can be customized if "ELEV" doesn't suit you. There is a red (pen 10) line at the center of the door(s), and nodes at the edges of the doors. The door is not part of the object; you need to place a door in a wall normally. There are also hotspots at the center of the track and at the centerlines of the required structure for the track.

The associated pump equipment is a separate object, Elevator Equipment JM16. I also have a call box symbol for the electrical plan, Elevator Call Switch JM16.

Download (AC16)

CL Types

Location: 01 General / 1 Graphic Symbols

This is your basic CL symbol, since most fonts don't have it. You can change the font and size, and apply bold formatting. It's is an update to CenterLine Sym JM9, which it replaces. It should be on BIMcomponents soon, or you can download it here. I've added two features based on community feedback.

First is the option to show a line in addition to the symbol. If the line is shown, you have the option of repeating the CL symbol at the other end.

Update: If the line is shown and the symbol at the end is on, the symbol at the start can be turned off. In this way you can have the line pointing up from the symbol.

Second, I saw Jakub Chruscinski's version of my old symbol on BIMcomponents, which includes a complete font list in the text options. I'm offering the complete list as an option since it seems like something people like, but it defaults to off. I prefer to restrict the list to our standard fonts.

The default font is Arial in the version I am sharing, but the sublime font in the preview is Gill Sans, which is what we use in practice.

Wonkish: The symbol code consists of two text blocks whose alignment is set using X and Y coordinate offsets with absurd precision (0.0001"). Not all fonts will look right automatically. To get an arbitrary font to look good, you might need to open the 2D script and modify the offsets.

Placement tip: Set the object to insert by the top or bottom hotspot, and use the Rotated geometry method of the object tool.

Download (AC16)

This is everything I can think of about libraries management. There have been a lot of changes over the years.

More»

Current naming standards. Still very boring.

These rules aren't set in stone, but if we all stay near the rules we all stay near each other. Like all standards, they work most of the time. When a situation is addressed by the standards, you can save your creativity for the projects.

More»

Adam Savage is a huge fan of The Shining. In homage, he built a replica of the Overlook Hotel's hedge maze model which is so awesome that... well, watch the video. I am a huge fan of The Shining, and of Adam Savage. In homage, I made this Archicad model of the Savage replica.

Maze 3D

I used much less time, material, and skill, but I followed a similar process to that shown in the video: Figure out the grid, figure out the scale, obsess over screenshots, find good materials, and don't let it go even as it takes longer than it should.

While Adam makes clear that his model is a replica of the (prop) model inside the hotel, not a model of the maze itself (which likely does not 'exist'), my model is roughly 50:1 scale with the replica, restoring it to 'real life' scale, based on the discussion in the video.

So this is a virtual model based on a video of a real replica of a lost real model of a likely unreal maze from a movie. (No, the maze isn't in the book IIRC.)

If you want a "model" of the maze, i.e., a miniature replica at 1:50 scale, suitable for modeling the Overlook itself, you can save the whole thing as an object and then shrink it. Use the saved view called 'Top View', select all elements, then File -> Libraries and Objects -> Save Selection As... -> Object. When placing the object, link the XYZ dimensions with the chain button and set the length to about 8 feet / 2.5m. Put it on a table.

Here is the PLA file (8MB). Here is the desktop BIMx file (4MB). Here is the Graphisoft BIMx viewer page. Here is an STL file (1.3MB).