On Land

Environment Information
At Rill & Decker Architects we run ArchiCAD on Mac OS X. If you work at Rill & Decker, this is your stuff. If you don't, but you work in ArchiCAD, you may find something interesting. Anybody else, I don't know.
RSS
March 2005 Archive

For large format output we use that enormous, hot, 16-amp-pulling thing in the middle of the office.

Here is how to install the plotter on your machine.

In PlotMaker, Page Setup. Go to File -> Page Setup. (Not Plot Setup!) At "Format For", select "WINPRINT 192.168.1.29". Select the Paper Size from the next pulldown. 18x24 is ARC C. 24x36 is ARC D. 30x42 is 30X42, not ARC E. (11x17 should be printed on the "small" printer.) To summarize, the only sizes we use are ARC C, ARC D, and 30x42.

In PlotMaker, Display Options. Make sure the fills are set to display "All Vectorial."

If you plan to print "Selected in Navigator", see below, highlight the layouts you want to print.

To print, issue the Print command by File -> Print, Cmd+P, or a toolbar button. Make sure the WINPRINT printer is selected. Set the number of copies. Click Copies & Pages and choose PlotMaker. Select what to print. Don't check "All Colors to Black."

All of the above can be automated by using Publisher, which is a really good idea.

When you print, the print job actually goes to the PC [insert snark] next to the plotter. Depending on the size of the job, it can take a while for the job to process. If you bring the PlotBase application forward, you should see your job at the bottom of the list. It will read Preparing Data, Pending, then Plotting. To reprint a job, right-click on and choose Status -> Pending. I know, real intuitive. The last 50 jobs are saved.

Plotbase troubleshooting: Make sure the "Play" button is pressed (gray). Make sure the "reader" is on (Configuration Menu).

Once the sheets start coming out, it's quick, seven D sheets a minute. Right now we don't have any facility for catching the sheets as they come out. You can grab them one at a time, or pick up the pile at the end. We'll keep working on it. Also not well-solved: binding.

Publisher is the best way to get output from PM. It allows you to save view sets with output settings, so you get the same result every time. I recommend it for printing and DWG creation.

Publisher is based on the view set concept, like in ArchiCAD, except that in PM view sets are only used for publication and you won't encounter them otherwise. You should have a view set for each output you produce with any regularity.

More»

Print Complete
Print T/A1/A2
Print Custom
Plot Custom
DWG Stake
DWG A1/A2
Print SKs

We have long had the convention of beginning our layout names with the number of the sheet, e.g., A1-1 1st Floor Plan.

This is no longer needed.

PM has a feature to "Show Names & Numbers" in the Navigator. It's had this throughout the life of PM3/PM9, but in the beginning, plot file names would not include the number even if it was displayed, so we had to put the numbers in the names to get the plot files named correctly.

Two things have changed. First, if you plot a layout with the number showing, the filename will have the number. (I don't know when they fixed it.) The same goes for DWGs. Second, we don't plot anymore; our archive files are multipage PDFs where the individual layout names are not seen.

So: Switch your Navigator tree views to "Show Names & Numbers" using the flyout at the bottom of the tree; and stop putting the numbers in the names. I recommend fixing the names of layouts in running projects; it doesn't take that long.

I have updated the templates with this change.

Don't forget to install the plotter.

Do the ArchiCAD stuff first.

More»

You need a PMK which has the pen settings you require.

If you are changing the pens in order to plot, or toggle between printing and plotting, use the PMKs located at 3 Resources : Attributes.

If for some reason you need ArchiCAD pens in Plotmaker, save any PMK from AC.

Import the PMK to your layout book. Place the drawing outside the printable area. Option+click on it. Cmd+Option click on the corner of the paper (the larger rectangle, if your margins aren't zero, which they probably are.) Check both boxes, and OK.

If you like, you can create an empty layout to hold the drawings.

That's it.

You can use this to get the new pen settings into existing layout books, instead of importing the whole book into that empty file. The standard printing pens are in the file "Standard Pen Table Mar05.pmk", also in 3 Resources : Attributes.

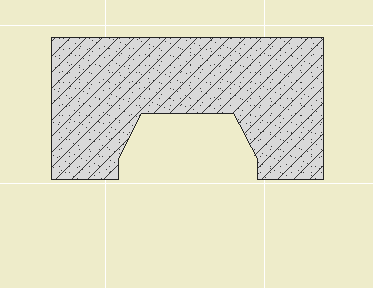
Start with a polygon wall in the shape of the firebox and chimney plan. The height should be the height of the firebox opening. The fill should be rubble, assuming stone veneer.


1 Stone polygon wall

More»

Location: 04 Masonry : Chimney & Fireplace

Just the fire brick part. Looks good in plan, section, and elevation. For a correct section, align the polygon wall of the firebox core with the inside of the Lining object, then subtract the object from the wall.

Images below the fold.

More»

Location: 04 Masonry : Chimney & Fireplace

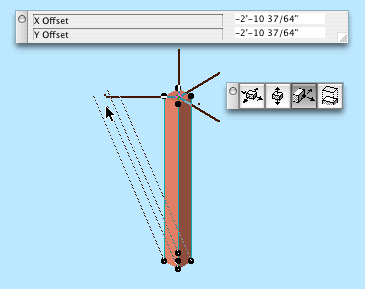
A round or rectangular tube for modeling chimney flues. The top can be offset for a sloping flue.

Plan Display & Editing

"Show Cut" means a white box with a X. "Show Slant" means the path of the sloping flue, typically shown dashed. Both can turned off, in which case the object will be invisible, but the nodes will remain. The cut polygon can represent the top or bottom. The flue size is stretchable by any corner. The top offset can set by stretching the green node.

3D Editing

The offsets and the height can be edited with the green node in 3D.


Offset stretch in 3D

General use

The idea is to build the flues out individual segments using the object. Use the layer A Flue. Subtract the flue objects from everything they pass through. When subtracting, use "Inherit attributes of operator".

The layer A flue should generally be set to wireframe.

I had a thickness parameter in there, to show the flue material itself at large scales, but I had to take it out because of incompatibility with the smoke chamber object.

UPDATE 3-16-05: Round option. Duh.

It's slow to open the settings dialog when you can use the info box.

It's slow to choose File -> Save rather than typing Cmd+S.

It's slow to choose File -> Merge rather than typing Opt+M.

It's slow to hunt down the close button at the top of a window rather than typing Cmd+W. However: it's slow to bring a window to the foreground so you can close it, if you can click its close button in the background.

It's starfish-slow to choose Edit -> Copy, choose Options -> Stories -> Go Up A Story, choose Edit -> Paste, rather than holding down Cmd and typing C, 6, V.

It's canyon-formation-slow to choose Tools -> Display Order -> Bring Forward, Tools -> Display Order -> Bring Forward, Tools -> Display Order -> Bring Forward, Tools -> Display Order -> Bring Forward, rather than holding down Ctrl and typing 6, 6, 6, 6.

It's slow to right-click and choose Undo, right-click and choose Undo, right-click and choose Undo, right-click and choose Undo, right-click and choose Undo, rather than holding down Cmd and typing Z, Z, Z, Z, Z.

It's slow to drag windows around until you see the one you want rather than use Exposé.

It's slow to go to Display Options when you can use this.

It's slow to go to the Project Map, scroll to the Details part, right-click on it, and choose New Independent Detail, rather than typing Ctrl+D.

It's slow to right-click and choose Open Section/Elevation, or Last Section/Elevation, but unfortunately we don't have a choice.

The fastest way to cancel anything is to type Esc.

The fastest way to deselect is to type Esc.

The fastest way to remove marquee is to type Esc.

The fastest way to switch to the Arrow is to type Esc. The second fastest way is to type Right Arrow, and that's better a lot of the times because it doesn't require that you have no selection and no marquee.

The fastest way to activate the Marquee tool is to type ` (the key above Tab).

The fastest way to activate the Wall tool is to type 1.

The fastest way to activate the Slab tool is to type 2.

The fastest way to activate the Roof tool is to type 3.

The fastest way to activate the Text tool is to type E.

The fastest way to activate the Fill tool is to type F.

The fastest way to activate the Door or Window tool is to type D or W respectively.

The fastest way to change the reference line side of a wall is to type C.

The fastest way to change the geometry method (box, rotated box, polygon, etc) of any tool is to type G. It's also the fastest way to switch the orientation of the dimension tool.

The fastest way to turn on gravity and choose the gravity element type is to type V.

You can do all those things without moving your left arm. You have to move your left arm a little, but it's still fastest to

...activate the arc tool by typing 0 (zero),

...activate the Object tool by typing (letter) O,

...activate the line tool by typing L,

...activate the Dimension tool by typing /.

...toggle the rotated grid by typing K.

Plenty more where those came from.

I will try to flesh this out when I have time. It's a solid method, and touches on a lot of useful techniques.

• 3 coincident walls for fire box: Stone veneer, block core, fire brick. All go on A Fireplace.

• Use roof for back of fire box; SEO add to firebrick wall. Roof goes on X SEO General.

• SEO Subtract firebrick assembly from core. Subtract FB assembly and core from veneer.

• On top of firebox, 2 slabs or walls, one inside the other, veneer and core. Both go on A Chimney3. Subtract core from veneer.

• Smoke chamber: Mesh. connect firebox void to smoke chamber with slab. Both go on X Flue. Use print-white pens. Subtract both from the core Chimney3 element.

• Flue: Object, Flue JM9. Can be plumb or offset. Build the flue out of segments, attach to smoke chamber, work your way up. Some flues will show in plan, check the "Show Cut" box in settings.

• Subtract the flues from everything they pass through.

• Use slabs for hearths, adjust Chimney3 elements as needed. Fill in with Chimney3 walls or slabs as needed.