Deprecated. Read this instead.
I think I need an Obsolete category.
Initially I thought you would have to change all the pen settings in each layout book, but I found a workaround: Import the current book into an empty book with the proper settings.
Move your layout book to "Old Files", just in case.
1. Open "Empty Book 0105.lbk". It's at the top of 3 Resources (the Onion).
2. File -> Import (Cmd+Opt+I). Select your current book. In the Import dialog, check the layout book on the left (at the top). This should cause the whole list to be checked. Check the "Use Source Hierarchy" box. If you miss this step, no subsets for you! Click Import.
3. In Drawing Usage, if you have PlotSetup tiffs, delete them.
4. In Tree by Subsets, delete "Layout 001". Select the Main master layout for your sheet size (e.g., D Main), click Settings (or Cmd+T), and check the box for "Set as default for new layouts". Delete the master layout called "master1". (You can't delete it until you set another master as the default for new.)
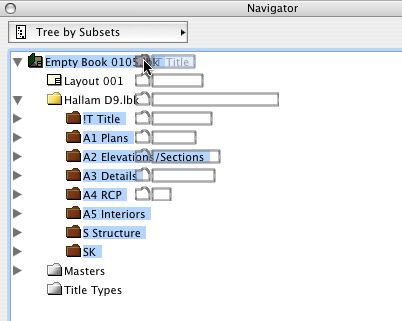
4a. [UPDATED] When you import the layout book, the layout book comes in as a subset, with all the other subsets inside. This doesn't seem to do any harm to the sheet numbering, but just in case, you should get rid of it. Close all your good subsets, select them, and drag them to the layout book title, at the top.

Then delete the empty subset folder.
5. Save As, using the same name as before, at the top of the project folder. You shouldn't be replacing, since you moved the old book to "Old Files".
Now you have a functional layout book with the new pens. Now you need to do Page Setup, adjust some master layout elements, realign the plans, and a couple little things. Could be worse!
1. Go to File -> Page Setup. (Not Plot Setup!) At "Format For", select "WINPRINT 192.168.1.29". Select the Paper Size from the next pulldown. 18x24 is ARC C. 24x36 is ARC D. 30x42 is 30X42, not ARC E. (11x17 should be printed on the "small" printer.)
2. For each master layout in use, click the "Settings" button (or Cmd+T). Click the Paper Size pulldown and select "Import Settings from printer" (at the top). This brings up Page Setup again. OK it, then OK the Master Layout Settings.
3. Update the title block drawing on all the Master Layouts that are in use. (You switched the object in Archicad, right?) Move the title block drawing so the center is on the center of the paper (The layout center is detectable and represented by a little +.)
4. Move the sheet number autotext block ("Undefined Layout Number") so the center is on the number box center hotspot.
5. All your plans probably need to be moved. They are likely too low and to the left. Horizontally, align the right edge of the drawing with the left edge of the title block. Vertically, align the center of the drawing with the center hotspot of the layout. Do this right, so your plans stay aligned.
5a. Other drawings might need to be moved, too. Look into it. The alignment precision isn't as important with non-plans.
6. Options -> Display Options. Switch Fills to "Keep Original Setting". One of the differences between plotting and printing is that fills are always Vectorial when plotting, regardless of the Display Option. For printing you have to set it right. This is an easy one to forget that will make your output instantly terrible.
7. [Very, very long section about modifying pens deleted from here. Yay.]
8. You will need to redo the Book Info.
