Update: This refers to the old version of interactive schedule, now called 'Element Schedules'. The principles are the same, but some of the names and menu commands have changed.
Zones are better than fills for area measurement because they can be updated when the walls (&c) enclosing them have moved.
(Zones are cool for so many reasons, but let's try to stay on topic.)
You can use Interactive Schedule to get the area of each story, of the rooms individually, and of the entire project.
I will describe two methods of floor area calculation: First, the gross area of each story, ignoring interior walls. Second, The total room area, or usable floor area, which will be less since the area occupied by partitions is not counted. There are different occasions to use each one.
Gross Area
Ingredients:
• The '0 GROSS AREA' zone category, the gray one, which is in the templates, and has been for a while; your current projects probably have it.
• The layer Z Gross Area, which is in the templates but it's new. You can create it in current projects.
• The layer combination (LC) Z Gross Area, also new in the templates, you don't have it otherwise. it shows only A WALL EXT and Z Gross Area. It's easy to create.
With this LC active, you should see only the exterior walls. Unless you've been perfectly conscientious/lucky up to this point, there are probably some mis-layered walls; interior walls on A WALL EXT and (not-showing) exterior walls on A WALL INT. Take this opportunity to fix all that. The exterior walls must form an empty, closed polygon for the zone to be accurate.
NOTE: If you want to leave the garage out of the calculation, put the walls between the house and the garage on A WALL EXT.
Set up the zone tool to use the '0 GROSS AREA' zone category, and the 'automatic' geometry method (second button). The '0 GROSS AREA' zone category should be set to use the 'Basic Zone Stamp'. If it isn't, fix it at Options -> Attribute Settings -> Zone Categories.
On each story, click inside the walls. Assuming the polygon is closed, you'll get the hammer cursor, which here means, 'where does the stamp go'. It doesn't matter. The Basic Zone Stamp shows the zone area, so you can get it at a glance, but remember we're going to use IS to do the actual calculation.
I like to name the zone after the story it's on. For the number I use story number times 1000; first floor is 1000, second is 2000, basement is 0000. This is really just hygiene.
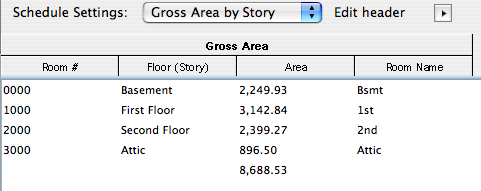
Once all the zones are placed, go to Calculate -> Interactive Schedule -> Preview... (I have this assigned to F6. For other IS techniques, there's a lot of back and forth, and the shortcut is helpful.) At the top left of the dialog, choose the 'Gross Area by Story' schedule setting. It will think for a minute and then you should see something like this:

You can rebuild this schedule at any time. Just make sure the zones are updated.
Room Areas by Story
This method is simpler since it uses the zones of the rooms themselves, which you should already have. Remember to update zones before calculating.
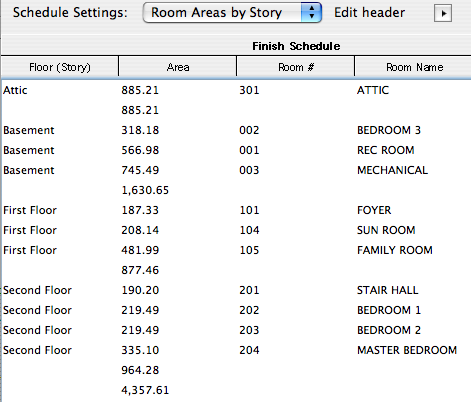
Go to Calculate -> Interactive Schedule -> Preview... and choose the 'Room Areas by Story' schedule setting. You should get something like this:

I trashed most of the zones on each story so the total would fit.
This method is most accurate when all the space in the plan is zoned; all the closets, stairs, everything. Use appropriate zone categories for these.
You can choose to ignore the circulation, closets, or whatever by editing the criteria of the schedule to not grab zones of those categories. If we were doing commercial, this is how you would calculate leasable area. The default schedule setup leaves out Porches/Decks and Garage.
For either method, and for any IS calculation, in doesn't matter if the elements' layers are showing. Once the zones are established and updated, they don't need to be visible in order to build the schedule. One more thing: IS will calculate elements across all stories, unless elements are selected, in which case the schedule will reflect only those elements. This comes in handy sometimes.
