On Land

Environment Information
At Rill Architects we run ArchiCAD on macOS. If you work at Rill, this is your stuff. If you don't, but you work in ArchiCAD, you may find something interesting. Anybody else, I don't know.
RSS
June 2006 Archive

3D wall cleanup is substantially improved in AC10. It's still not perfect, but many more junctions that should cleanup actually do.

Example: This tip should be workable in AC9, but it just doesn't clean up. In 10 it does, so here goes.

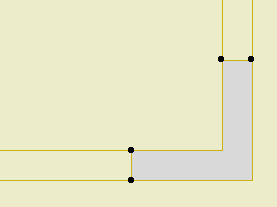
Instead of using a cornerboard object, use a polygon wall. Use one wall for all the stories. That is, the base is perhaps somewhere around zero and the top is up around 20'. Set the Show on to 'Automatic' and the Floor Plan Display to 'Projected'.

cornerboard polywall

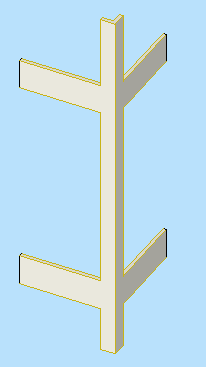
If you have band boards, they should meet the ends of the polywall, rather than forming a corner themselves.

cornerboard polywall

You can place as many band walls as you need, on whatever story, and they will all clean up. With the object, they don't.

cornerboard polywall

The wall also has the advantage of being stretchable in section. Can't do that in 9 either. (As of the writing, there's a bug in 10 which prevents vertically stretching polywalls in 3D. That can't last.)

After some experimentation, this is the best method I can find for using external, standard details. It definitely has room for improvement. The biggest improvement would be for AC to allow detail markers to reference external drawings. It's a huge hole in the program that has to be fixed. In the meantime this isn't too bad.

The executive summary: Copy details from projects and clean up their layers and other attributes. Place the details in a central PLN file, one per story. Or, draw them from scratch in the central PLN. Publish modules of the details. Hotlink or merge the modules into detail windows of running projects, and use detail markers to refer to them normally.

In this example I'm talking about the wall and other assembly types. It could used for any standard details you would like to share. Also, we will use this as a standard method beginning with AC10. In the meantime, everything here which concerns placing detail modules can be applied to current assembly modules at 3 Resources / Modules / Assembly Types.

More»

2006-06-17.jpg

Every attribute (pen, fill, linetype, layer, etc) in AC has a unique ID number. Internally, AC handles attributes by their IDs. The names are just for us. The IDs control the interactions between attributes, and the default parameters of objects. When a composite or material has the wrong fill, or an object comes in with a surprising default setting, it's often because IDs have become tangled up.

They don't get tangled up on their own, but it seems like they do, as we create and delete attributes, merge them from other projects, etc. Attribute Manager gives us some ability to manipulate IDs, but it's tricky.

Here's an example of the gymnastics you need in order to work with the antiquated attribute ID system. On the other hand, at least it's feasible. On the final hand, it is unbelievable that we can't edit IDs directly, and really we shouldn't have to interact with them at all.

It's also a good example of how attribute IDs can mess things up, which is why you have to hack them.

In this case, all the openings in the Archicad library default to drawing their overhead lines with linetype ID 4. In the templates that ship with AC, that ID is a dashed line, which is fine. In our templates, ID 4 is the 'Layout' linetype, a dot and dashed thing. So unless you change it, the openings look like this:

Bad Dash
Errrrrrg.

Moral: Generally speaking, attribute IDs are strong and attribute names are weak. AC only cares about the '4', not the name 'Dashed', and not the dashes themselves.

The other moral: Especially where libraries are concerned, it's best not to fight default IDs if you can avoid it. It's better to fix one linetype rather than a whole pile of objects. That's where the gymnastics come in.

More»

image

Location: 01 General / 1 Graphic Symbols

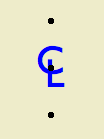
If you're local (in the same room), this won't make much difference to you. I have generalized the old CL symbol so I can offer it for download on the new Archicad Talk Object Depository. This means I'm enabling flexibility which I, and the locals, don't need.

For everyone else. This is your basic CL symbol, since most fonts don't have it. You can change the font and size, and apply bold formatting. Now I'll copy and paste the helpful commenting from the 2D script:

!! The default font is Arial, since that
!! seems to be the default font of the
!! universe. If you have Gill Sans, use
!! that. It looks best IMO. It's the font
!! in the preview image. Full disclosure:
!! I'm not into the faux-hand lettering
!! thing.

!! If you put in a custom font, and you're
!! graphically particular, you might need to
!! adjust the Text Offsets to get the right look.

!! The top & bottom hotspot offset is
!! proportional to the point size. I don't
!! know what happens with very large sizes;
!! you might need to adjust 'spotY' as well.
!! Personally, I never mess with the size; I just
!! put it in for completeness.

!! Why aren't the offsets parameterized?
!! Because you shouldn't change them for
!! specific instances. They should be standards
!! that are invisible in regular use.

Placement tip: Set the object to insert by the top or bottom hotspot, and use the Rotated geometry method of the object tool.

Download (AC9)

Location: 01 General / 1 Graphic Symbols

An improved drawing list object, featuring any number of columns. You can also turn the heading off entirely. I ditched the vertical lines.

Two things you need to know. We are redesigning the standard cover sheet, and we have a couple of projects where the drawing list needs to be three columns in order to fit in its box. And, in 10, we have automatic drawing lists, so you're going to use the object only in unusual situations. (Too bad, it's one of my favorites.) With the auto list, the heading needs to be independent for technical reasons. For compatibility with the auto list, and the new cover sheet, we need to be able to turn the heading off.

All of this will make more sense when you actually start using 10. In the meantime, if you need to spread the drawing list over eight columns, go ahead.

Update: The 10 version is better.

Location: 01 General / 1 Graphic Symbols

(Any non-local people who would like to try it out, it's here.)

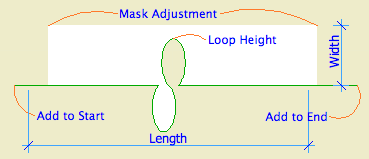
The elusive masking cutline. Then I started adding a bunch of other stuff, hence the strikethroughs in the title. Here's its simplest form:

Cutline JM9c

More»

The current standard for library loading is to load only the folder specific to the project. That is, don't load the entire 2 Project LIB 9 folder. I updated the templates so that the only libraries loaded by default are 1 Rill & Decker LIB 9 and AC9 Library Special Edition.

When the time comes that you need project specific objects, create a folder in 2 Project LIB 9 with a name like Projectname LIB.

When the project is completed and moved to Past Projects, the project library should be moved to 2 Libraries / Other LIBs / Past Project LIBs.

If you know of an object in a project library that you could use, ask the person who made it to move it into the standard library. Or, remember that you can load objects individually.

The idea is to not load objects that you will never use, such as other people's patches.

I started out describing the structure of the libraries, and I was going to stick it in the Libraries post, but it got too big.

So this is the what/where for the libraries. The fine details of library management are in the other post.

More»

This is the definitive statement on loading libraries. I'm putting it in the Standards panel of the sidebar. Like the other standards things, it will probably be updated occasionally.

Update: From the Project Libraries, only load the folder for the current project.

More»

It would nice to have standard details in one place, where any project could use them with no need to redraw anything. These would be standard assembly types, foundations, flashing, etc.

You can place views from any number of external project in a layout book in 9 or 10. The trouble comes in when you want to refer to the external drawing with a detail marker. Even in 10, this is still not possible.

So we have to consider a couple imperfect alternatives.

• Maintain modules, one for each detail. Merge or hotlink the modules into detail windows within the project. Refer to the internal detail drawings normally.

If you hotlink the modules, they can be truly standardized, with any changes distributed to all projects by updating hotlinks. The drawback is the module reference warning if you take the project off network. No harm, just hassle. (You could choose to break the hotlink, which would leave the detail intact, but it wouldn't be connected to the original.)

As an alternate to separate modules, you could place all the details in one project file, with one detail on each story. In this case, merging is not an option. You would hotlink the stories and optionally break the hotlinks.

Then you could use Publisher to create modules if you wanted them.

The one-project method also makes attribute management easier. It's important to rigorously control attributes so you don't 'contaminate' the current project.

Using hotlinks to the detail project stories presents a problem: You can't insert a story without breaking the links in projects. Ouch.

• Use external views directly, even though the referencing doesn't work. You would need a fixed ID, specific to the detail, which would appear in a drawing title object in the detail, and in the detail ID in the project. These IDs would bear no relationship to the sheet. Weird.

Conclusion:

• Create the details in a project file, one on each story. This is simpler generally and helps with the attributes.

• From this project, publish modules of the details. Then the modules themselves are hotlinked or merged. The detail project becomes an administrative resource; users don't interact with it directly. The stories can be managed for the convenience of the 'detail administrator'. Whenever a detail is added or changed, republish the modules.

• Hotlink or merge the modules into project detail windows and reference them normally.
Details need to be processed before merging them into running projects, or into a details PLN. It is important to avoid merging unwanted attributes, especially layers. This process simplifies the layers and gets rid of all the unneeded attributes.

This method should be considered alongside A Method For Standard Details.

Standard details will be administered by one or two people at the most.

More»