On Land

Environment Information
At Rill Architects we run ArchiCAD on macOS. If you work at Rill, this is your stuff. If you don't, but you work in ArchiCAD, you may find something interesting. Anybody else, I don't know.
RSS
PlotMaker Archive

In PM, in Drawing Usage, highlight an item (drawing). At the bottom of the Navigator, there's a button.

If you highlight a View linked to a PLN, the button says, 'Link To'. If you click it, you get an Open dialog where you can select a PLN.

If you highlight a PMK, the button says, 'Read From'. If you click it, You get an Open dialog where you can select a folder to read the PMK from. PLNs will be grayed out. In fact, all files are grayed out; you can only pick a folder.

So far so good. The confusion arises when trying to re-link multiple views at once.

If you select all the drawings, you get 'Read From', because of the PMKs.

You say you don't have any PMKs? And you're not even selecting all the drawings? And you get 'Read From', and you click it, and you can't choose a PLN?

Here's the deal: You can't select drawings which refer to different PLNs at the same time. The button turns to read from, which is useless, literally. I have no idea why. Why anything. First of all, it should work. Second, if it doesn't work, PM should gray out the button, rather than offering an option that doesn't work. But this is PM, remember.

A common driver of this problem is having some views linked to an actual project, and some still linked to a template project.

An even more frustrating cause: When we switched servers, AC & PM went psycho over thinking the new server was a different machine, yet being OK with it having the old IP address. This is why we get 'Connection Failed' errors, while whatever connection it is is actually fine, and updating (e.g.) proceeds normally.

PM can think that links go to different projects, even though the path is identical, and even though the actual update works fine. It's really stupid.

The solution to the 'Link To' problem is this: Add views to your selection one by one, while watching the 'Link To' button. When you see it change to 'Read From', deselect the last view you picked. It should switch back. At this point, you can 1) Skip the bad guy and keep trying to add view to the selection or 2) Go ahead and Link the ones you have, then start again. The goal is to work through the views, linking as many as possible at a time.

Summary:

• You can't re-link views from multiple projects. Carefully select views to Link To together.

• It is impossible to link to a PLN via 'Read From'. If you have a bunch of views selected and the button says 'Read From', you have a problem. Click 'Read From' if you enjoy a frustrating waste of time, but otherwise no.

• I hate PlotMaker and I wish it was dead.

Obsolete. Referencing in AC10 and later doesn't work this way.

It sure is nice the way detail markers know where their drawings are placed. It sure would be nicer if we could as easily refer to any placed drawing. If you could place dynamic drawing and sheet references in section marker objects, and call out enlarged plans, and write notes of the form, "Do this like this, see detail A3-5/12." And since you can't place details in detail windows, use an object detail marker there.

Well, you can refer to any placed drawing. But I wouldn't call it easy. In fact, I think this is the most annoying worthwhile thing in all of ArchICAD.

Here's how. We'll do the drawing number first.

Import the drawing to a layout.

Right click on the drawing (in the layout or in the tree) and choose "Set as Autotext Reference".

Activate the text tool. Start a text block by double-clicking. In the text editing area (at the cursor), right-click and choose "Insert Autotext for [DrawingName]" -> Drawing Number. This results in a blob of gibberish like "< DRAWINGNUMBER_R ><9BEA5D4E-8700-11D8-8AA9-000A95A7B33A>". Copy this. Tip: Cmd+A works to select all while editing text. So, Cmd+A, Cmd+C.

Return to Archicad. Open whatever it is that needs the reference, e.g., a detail marker object or a text block. Paste into the appropriate field or location.

Of course, you usually need the layout number too. Return to PlotMaker. You should see the open text block as you left it. Delete the DRAWINGNUMBER stuff. Repeat the process, this time choosing "Layout Number". Cmd+A, Cmd+C, Back to Archicad, Paste.

A detail marker will look like this in Archicad:


The gibberish bits resolve themselves in PlotMaker, giving the location of the drawing you set as autotext reference in the beginning.

Remember that it's very easy to drag drawings between layouts while in Tree by Subsets view.

If you have a big pile of new drawings (details, interior elevations) destined for multiple sheets, import them all at once into one layout. Then distribute them by dragging them in the tree.

Attention: The only reason to plot instead of print is to send drawings out, until the print shops learn to print our PDFs without mangling them. DO NOT PLOT for archiving, or for printing in-house. PLTs look pretty bad when printed here. This method is offered as an emergency backup for when we run out of paper, or to print more sets than we can comfortably collate & staple ourselves.

I look forward to informing you that this technique is no longer needed.

More»

Publisher is the best way to get output from PM. It allows you to save view sets with output settings, so you get the same result every time. I recommend it for printing and DWG creation.

Publisher is based on the view set concept, like in Archicad, except that in PM view sets are only used for publication and you won't encounter them otherwise. You should have a view set for each output you produce with any regularity.

More»

We have long had the convention of beginning our layout names with the number of the sheet, e.g., A1-1 1st Floor Plan.

This is no longer needed.

PM has a feature to "Show Names & Numbers" in the Navigator. It's had this throughout the life of PM3/PM9, but in the beginning, plot file names would not include the number even if it was displayed, so we had to put the numbers in the names to get the plot files named correctly.

Two things have changed. First, if you plot a layout with the number showing, the filename will have the number. (I don't know when they fixed it.) The same goes for DWGs. Second, we don't plot anymore; our archive files are multipage PDFs where the individual layout names are not seen.

So: Switch your Navigator tree views to "Show Names & Numbers" using the flyout at the bottom of the tree; and stop putting the numbers in the names. I recommend fixing the names of layouts in running projects; it doesn't take that long.

I have updated the templates with this change.

You need a PMK which has the pen settings you require.

If you are changing the pens in order to plot, or toggle between printing and plotting, use the PMKs located at 3 Resources : Attributes.

If for some reason you need Archicad pens in Plotmaker, save any PMK from AC.

Import the PMK to your layout book. Place the drawing outside the printable area. Option+click on it. Cmd+Option click on the corner of the paper (the larger rectangle, if your margins aren't zero, which they probably are.) Check both boxes, and OK.

If you like, you can create an empty layout to hold the drawings.

That's it.

You can use this to get the new pen settings into existing layout books, instead of importing the whole book into that empty file. The standard printing pens are in the file "Standard Pen Table Mar05.pmk", also in 3 Resources : Attributes.

This is an unpleasant task you should never have to do, unless we get a new plotter. You don't even have to do it then.

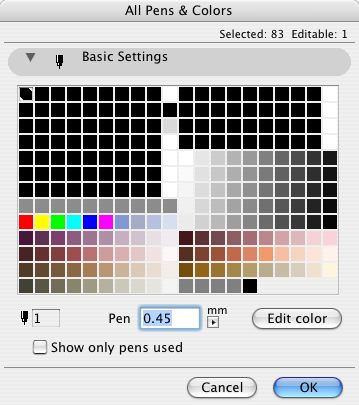
On the Options menu, All Pens And Colors. You get this:


A pen has two attributes, color and width.

Set the width using the field marked "Pen". Make sure the units are mm, not Pt (points).

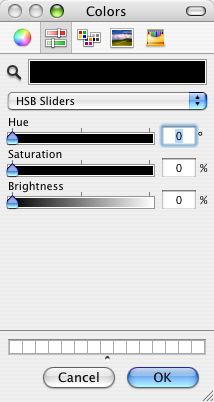
To change the color, double-click the pen's square in the grid, or select it and click "Edit Color". I recommend using the HSB sliders to edit color.


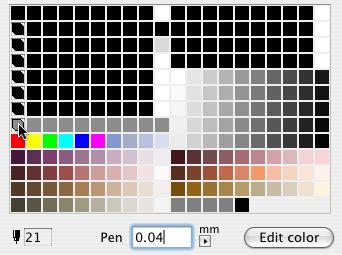
You can select multiple pens at once and edit their color or width together. Cmd+click on pens to accumulate them, or Shift+click to select a range. Like a lot of things.


Selecting all the pens between 21 and 141.

Editing pens in Archicad is similar, but we can use Attribute Manager instead.

In PlotMaker 3 (and above), you can place special tags in text elements which can intelligently display information about the project, the layout, the drawings, and the system environment (e.g., the date). This functionality, and the tags themselves, are known as AutoText.

AutoText tags must be in all caps, and they must be inside greater than/less than brackets.

When viewed in Archicad, tags will always appear with their name. In PM, the tag is interpreted and the proper text is displayed.

The main categories of tags are:

• Info about the placed drawing,

• Info about the layout,

• Info about the system environment and the project files,

• Info about the project itself, as stored in the 'Book Info'.

We already use AutoText tags in our drawing titles. They appear as "DRAWINGTITLE" in Archicad, then display the proper drawing number, depending on the arrangement, in PM.

AutoText is also used to generate the sheet numbers in the layout book. In the place of the number on the master layout, we have the tag "LAYOUTNUMBER", which is interpreted in each layout according to each subset's settings.

The "LAYOUTNUMBER" is placed directly in the layout using the text tool. To see how it works, go to a master layout and activate the text tool. Click to start the text, then right-click and mouse over 'Insert AutoText...' The flyout contains all of the AutoText items. Select 'Layout Name', then close the text. Switch to a layout that uses that master, and you see the text has turned into the layout name. (In master layouts, layout- and drawing-specific tags will always be interpreted as 'Undefined [Something]').

Like everything in PlotMaker, this is obsolete. In AC10, the info is in Project Info.

PlotMaker AutoText can display information about the project stored in the Layout Book Info. You can then use AutoText tags in title blocks to display the project name, address, etc.

More»

I have modified the layout book templates so that all the sheet sizes are avilable in one book. There are no longer separate books for each size. There is a 'New.lbk' in the 01 CDs folder, and an 'Existing.lbk' in the 09 Existing Conditions folder.

In the templates are master layouts for each sheet size. When beginning a book, hook the layouts to the masters of the correct size. You will also need to modify Plot Setup. In the 'Main' master for each size is a Tiff of the Plot Setup settings. Once you've done Plot Setup you can delete the Tiffs.

I have modified the Workflow article on starting a layout book, but if you see something in there that doesn't make sense let me know.

This is the old way. I decided to keep it for historical interest.

Building on the ability in OS X to save PDFs from the print dialog, we can easily create PDFs of drawing sheets. In PlotMaker 3, you can print multiple sheets at once to a single document, making one PDF of an entire set.

More»