On Land

Environment Information
At Rill Architects we run ArchiCAD on macOS. If you work at Rill, this is your stuff. If you don't, but you work in ArchiCAD, you may find something interesting. Anybody else, I don't know.
RSS
Obsolete Archive

All Entries | 1 | 2 | 3

This is obsolete. The final version is here.

I'm thinking of renovating the Layer Combinations. Don't panic: LCs aren't as hairy as the layers themselves, and I would deploy the new scheme in the template for AC10, which will be so disruptive that a new LC arrangement wouldn't even get your attention.

In my back-of-envelope analysis, there a three main types of LCs, and then a couple oddballs. The three:

Output. Used by publication views.

Working. Where you spend most of your time.

Special Tasks. Unusual LCs for doing a certain task once in a while. E.g., Site cutting, building stretching, elevations with just notes.

I would like these categories to be clearer in the LC list. The first draft is below the fold. The working LCs begin with numbers. The output LCs begin with the letter of their sheets. The specials begin with x. The oddballs: The binder LCs begin with z. Since they're not used until the very end, they have to be last.

More»

Obsolete. Use Stair Body JM9a. instead.

Location: 06 Wood & Plastic / Railings & Stairs (I'm thinking about moving it, since it's not really a fine detail-type thing any more. More like a missing tool thing. Not to mention, it could be concrete. I really wish the object browser could handle aliases. As for now, there it lies.)

A very basic (in a good way) flight of stairs. An incremental improvement on Stair Stringer JAM8. You can still use it as a stringer; just make it thin. I changed the name because I use it more often for actual stairs.

Sidebar: There's a stair tool (Technically, the StairMaker add-on), which you should never use. Then there's ArchiStair by the very capable and friendly Cigraph, which is like a good StairMaker, only better.

I recently used an ArchiStair spiral stair for which I was very grateful, but generally I am skeptical of full-service add-ons for highly detailed building parts. No matter how many options, configurations, and details are offered, you will soon run into a custom situation where the add-on doesn't quite make it.

I would rather have more, simpler, separate elements. (Well, no, I would rather have one element do everything by magic, but it's not realistic.) If you run into a freaky custom railing, you can focus on that without wrecking the whole stair. And: In design development, you can show just a simple stair, leaving the details for later, where they (the details) belong.

This is consistent with a general principle of Archicad's design, our workflow, and how projects are actually built. Big, chunky stuff comes first: Walls, slabs, roofs, the basic geometry of stairs. Fine detail comes later, and is applied to the big stuff: Trim, finish floors, newels and railings.

So: The Stair Body object is like a slab tool for stairs.

Another major basic-yet-detailed building part is the chimney. See what I mean? End sidebar.

Now we can talk about the object.

More»

(So Jon says, where's the existing template, and I tell him, and he says I looked online and I didn't see that, and I said, well I'll fix it, so here ya go. The library names were wrong too!)

1. Duplicate the zTemplate folder and rename it with the project name. To duplicate a folder, drag and drop it within the same window while holding down the Option key. Use the client name. If this is a second, or later, project, add a number. (Please don't use roman numerals, they are hard to read.) If it's a sub-project or related project, add a descriptive term. Examples: Stevens. Kernan3. Salamander Garage.

2. Open the project file template for new home or addition. The template names end in .tpl. The new template is at the top of the project folder. The existing template is in the '4 Site & Existing Conditions' folder.

3. In the library manager, make sure you have 'Archicad Library 9.pla', '1 Rill & Decker LIB9', and '2 Project LIB9' loaded. Click 'Library Cache Settings' and make sure 'Use a Local Copy' is UNchecked. Click 'OK' and 'Done'.

4. Once the libraries load, Save As. Format: Archicad Project File. For the name use the client name, similar to the folder name. For an existing house use 'Existing Somebody.PLN'.

5. Go to the Finder and delete the project templates from your project folder. They are no longer needed. If by some weird chance you need a template again, you can always get it from the zTemplate folder.

6. Get busy!

Update for AC10: This story has been deleted from the templates. The new schedules in 10 can be placed as drawings, so the Schedules story isn't needed.

No, it's not every day we have a new story. It's also our first non-building story. I believe strongly in the building analogy of the AC project file, so I don't generally approve of stories for non-building purposes.

Here we don't have choice. This story is for Interactive Schedule elements, which can't be placed in any other window. You could handle this issue with layers, but you'd need an additional note layer. The pseudo-story down in the ground bothers me less.


Some schedules

You can also use it for this energy calculation method, which requires that the fills be in plan.

And anything else you think of that has to be in a plan window.

Note: Schedules in AC10 are completely different.

In here, where you can't see them, I have drafts of posts. The list of drafts can be viewed as the to-do list for the site. Stuff I know I have to tell you about, but I haven't gotten around to actually doing it. Many of the drafts relate to features of AC that are very powerful and proportionately complex. I don't want to regurgitate the reference guide, but I don't want to merely point you at the reference guide either. So there they sit. Since we're talking about powerful features, naturally there are other drafts of specific tips which have as prerequisites knowledge of the powerful features.

Anyway it's more important that you have the specific tips than the admirably balanced non-regurguitated, non-merely-pointing-you master post. Between the tips and the reference guide, you'll get the big picture. I hope.

One of these features is the Interactive Schedule (IS). We even had a meeting about it, since it's a lot easier to show and tell than to describe in text. I use the IS for door and window schedules, finish schedules, area calculations, and energy calculations. I also use is as a hack Find & Select for parameters within an object, so you can find all the crown elements that use WM-47 and change them to SM-28. Chances are some of these methods interest you, and I think they should, and I've been stalled in documenting them by the intimidating difficulty of the master post, which you'd think from the title would be this one.

So. The IS is documented in the reference guide beginning on page 374. Consider yourself pointed.

The ref guide does OK at telling you what the IS can do, but I think it's still up to me to point out its limitations. It is still very much a 1.0 feature.

• It only works in plan.

• It is modal, that is, you have to dismiss it in order to work in any other window, unlike, e.g., the Find & Select box.

• It can't do math beyond adding a column of numbers. No way to reduce an area by a percentage, e.g.

• The method for sharing schedule settings between projects is pathetic.

• It has too many poor interface quirks to list here.

It does what it does. In the future it will do more, and it's already way more accessible than the rest of the calculate menu.

More to follow.

PS, another big one is Hotlinked Modules. You need those for the energy calc thing I mentioned above. Sigh.

Obsolete in AC10.

Location: 01 General : 1 Graphic Symbols

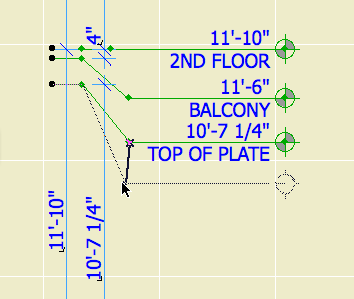
An incremental improvement to Elev Marker JAM8, which it replaces. The 'bending' is now handled by editing hotspots.


First spot: beginning of bend. Second spot: End and depth of bend. End spot: depth of bend and length of object.

Somewhere along the line I added the ability to display the elevation relative to sea level as well as project zero, without telling anyone, so now I've told you.

I'm still not totally comfortable with the SK routine. For example, if you place the SK title block in the plan, you run into trouble when the SKs overlap. And it's a pain to set the scale when using the title block within PM.

Here's what I'm doing as of now. It probably still can be improved, and as Vassos starts needing revisions I'll probably make further progress. This shouldn't be interpreted as standard right now.

Create a new layout in the SK folder. Use the SK Master, the one without the title block. Name the layout what you what to print on the SK. The autotext in the title block object will render the layout name.

Set up the title block in the AC detail window with the date, sheet ref and scale. Import the 'xSK Title' view into the layout. (Not the Master Layout.) Tip: In the Navigator, copy the title block drawing from the 'SK Blank + Title' Master. (Drag while holding Option.) Make sure you update it.

Select the title block drawing and explode it. That turns it into 2D elements. When you change the title block in AC later, this layout won't care.

Import the relevant view(s) to the SK layout. Tip: Copy the views from wherever in the set they live, and update.

Interlude: Drag-copying in the Navigator. You can easily move drawings between layouts by dragging them in the Navigator. If you hold down Option while doing so, you will make a copy. You can be sure you are copying rather than moving when you see the green plus-sign circle.

Once the drawings are in place, go to drawing usage, select them, and click 'Break Link'. This basically turns them into PMKs that are embedded in the layout book. In drawing usage their status will read 'Embedded'. When the views from which the drawings came are updated, these PMKs will be untouched.

The combination of exploding the title block and breaking the views' links means that the SK layout will stay as it is, whatever else changes in the project and layout book.

The SK thing is a tricky area, since AC and PM are not naturally inclined towards revision control in their current state.

Obsolete. Referencing in AC10 and later doesn't work this way.

It sure is nice the way detail markers know where their drawings are placed. It sure would be nicer if we could as easily refer to any placed drawing. If you could place dynamic drawing and sheet references in section marker objects, and call out enlarged plans, and write notes of the form, "Do this like this, see detail A3-5/12." And since you can't place details in detail windows, use an object detail marker there.

Well, you can refer to any placed drawing. But I wouldn't call it easy. In fact, I think this is the most annoying worthwhile thing in all of ArchICAD.

Here's how. We'll do the drawing number first.

Import the drawing to a layout.

Right click on the drawing (in the layout or in the tree) and choose "Set as Autotext Reference".

Activate the text tool. Start a text block by double-clicking. In the text editing area (at the cursor), right-click and choose "Insert Autotext for [DrawingName]" -> Drawing Number. This results in a blob of gibberish like "< DRAWINGNUMBER_R ><9BEA5D4E-8700-11D8-8AA9-000A95A7B33A>". Copy this. Tip: Cmd+A works to select all while editing text. So, Cmd+A, Cmd+C.

Return to Archicad. Open whatever it is that needs the reference, e.g., a detail marker object or a text block. Paste into the appropriate field or location.

Of course, you usually need the layout number too. Return to PlotMaker. You should see the open text block as you left it. Delete the DRAWINGNUMBER stuff. Repeat the process, this time choosing "Layout Number". Cmd+A, Cmd+C, Back to Archicad, Paste.

A detail marker will look like this in Archicad:


The gibberish bits resolve themselves in PlotMaker, giving the location of the drawing you set as autotext reference in the beginning.

Why: Same reason as always. Model views are more consistent and easier to maintain. Modeling is the better way to work things out for real. You can block up passable wall sections earlier without sacrificing consistency. To get them graphically perfect will require conversion to drawing in the end, but you can put it off at least through design development.

How: Lots of 2D fills, lines, and objects placed over empty model elements. You were going to use all that 2D stuff anyway. A lot of the fill-placement is to make up for the fact that composites can't be scale sensitive yet.

More»

Like everything in PlotMaker, this is obsolete. In AC10, the info is in Project Info.

PlotMaker AutoText can display information about the project stored in the Layout Book Info. You can then use AutoText tags in title blocks to display the project name, address, etc.

More»

Note: This is obsolete starting with AC10. Use pen sets instead.

Now that you've had a look at the Attribute Manager, here's a move that would be almost impossible without it: Flip all your Archicad pens to PM settings, then flip them back, and it doesn't take all day.

Why? To print, especially to print PDFs. (PM is more capable in this area, but Archicad is quicker, and this pens trick gets you around the rainbow-lines thing.)

Along the way, we will meet a new friend, the attribute file.

More»

The layer for the SK Title Block. It has to be kept out of the way when you're not using it.

This layer is unusual in that it is hidden and unlocked in every output layer combination. There are no LCs of the form, A1 Floor Plan SK, A2 SED SK, etc. Since you might output an SK from any LC you would use for a CD drawing, we would need an SK LC for every current output LC. That's too many LCs for such a narrow purpose.

In practice, when preparing an SK, select the output view from the CDs viewset, then flip the SK Title layer on. (You can do this in the layer dialog, but I think it's faster to pick the layer in the info box, then respond to the 'that layer is hidden dialog after the first click.) Once you do this, you're no longer in an LC, but this doesn't matter when saving the view.

Obsolete. Use this method (zones) or this method (fills) instead.

Your first list. I'm so proud.

Calculate Menu, List Zones | FA [Something] (JAM8.lis). You can also find lists in the project map under 'Lists'.

There are several different calculations available: Rooms on each story, total rooms, garage, exterior spaces. Each is set up to include zones in the appropriate category and stories.

The list will give the area of each zone and a total. There is no way to do a subtotal by story; that's why the lists are separate. I feel your pain.

[Note: This object has been superseded.]

This is the stamp you will use most of the time. Right now it's the only one we have.

It's pretty hard to tell it apart from the Room Name object. There are some differences.

The name list is hooked up to the Room Name parameter of the zone tool, which lets you select from the list in the info box.

The text size of the name is also available in the info box. The size for the material label is only in the settings, though.

There are parameters for the crown type, base type, and ceiling finish, for use in generating a finish schedule. Note: You must enter these. They don't learn from the room automatically, yet.

Zones are calculation instruments. They represent rooms and other definable areas/volumes in the project.

More»

v2 is here. It seems to work. The good news is that layout books open like they were never closed. Fast! View updates are much faster too. The bad news, well, ya never know! Sigh. Seriously, I used it all week and it's OK. Still, it's good to be cautious.

Two gotchas so far (maybe you'll be lucky): 1) In PM, after stretching a frame with the arrow tool, frame nodes will not be detectable until you rebuild. Scroll-zooming forces a rebuild so that takes care of it. 2) After rebuilding drawings via drawing usage, the layout window becomes unresponsive. Minimize the window to the dock using the yellow title bar button. Bring it back, and it's OK. I think GS's beta testing consists entirely of demonstrating the software to their dogs. I digress.

The howto follows.

More»

BORING!

(Did you know April is national sheet setup month?)

I've modified the drawing area object. Whee! It is simpler, clearer, and just a bit more spacious. It also allows you to disregard the grid in PlotMaker, which allowed me to cut the layout book templates from 5 to 2.

The rectangle is the available drawing area. The ticks on the corners line up with the title block, and set a 3/16" margin around the sheet. Alignment hotspots should be placed on these ticks. The ticks along the edges at each corner are for aligning plan dimensions.

Note: This is superseded in AC10 by Sheet Area RND10.

UPDATE: This is generally correct, but it has been superseded by this.

So when we open them in the future, they cause as little trouble as possible.

More»

This is the old way. I decided to keep it for historical interest.

Building on the ability in OS X to save PDFs from the print dialog, we can easily create PDFs of drawing sheets. In PlotMaker 3, you can print multiple sheets at once to a single document, making one PDF of an entire set.

More»

For two reasons:

• Printing large documents that aren't PLT files, such as big PDFs sent by consultants.

• Creating PDFs of drawing sheets.

More»

NOTE: This info has been substantially updated.

RCPs are largely, not entirely, drawn. This is a gross deficiency of Archicad in it's current form. GS has to fix it, we can't. (It wouldn't be hard, though.)

More»

If you ever read anything more boring than this, I'd be very curious to hear about it.

More»

Send PLT files to the plotter using PlotFlow. Some day, we will be able to run it on the server. Currently, everyone has to run it locally.

More»

Read this. OK good.

I only save one PMK from AC*; the perspective drawing. Here's how to do it in publisher.

* The PMKs for schedules and such are created in PM.

More»

An overview of Publisher in AC9, and publishing DWGs. Publisher in AC10 and 11 is here.

More»

Superseded by this.

More»

(Defunct. This is better.)

Favorites are preset configurations of the tools. They enable you to quickly configure a tool for a given purpose, like option-clicking without the need for a placed element.

I have never developed a strong affection for them, for several reasons. They were terribly implemented when they started, in AC6.5 if memory serves. Until AC8, there was no button for favorites in the settings box (?!!). Finally, in a far-along project, option-clicking is still the fastest method. Modules are also nice.

In AC8 the feature is mature enough that I can recommend you try it.

More»

Update: In AC10, they made some changes to wall cleanup that simplify this process quite a bit.

Yes. Perfect. If you're into that sort of thing. It takes some doing.

More»

Obsolete. We're not using cach libraries at this time.

It's good to have the libraries on the server so we are all up to date all the time. But loading libraries from the network is slow. This is a big problem when updating views in PlotMaker. The satellite library is an attempt to have it both ways. It has been bumpy in the past, but I've tried it again and can cautiously recommend it.

More»

The backup routine ("Retrospect", you've seen the warnings) runs at night. If the machine is on.

We are set up to back up everyone's home directory around midnight. After that, you can come in and power down the machine.

In the sidebar of this page you will find a Downloads division, and under that a Template link, by which you can download the current zTemplate folder in Stuffit format.

When installing Archicad, don't do the Easy install. Custom install is faster and saves space.

More»

So easy anyone can do it. Unless it doesn't work.

More»

Read this instead

1. Put the file in Project:2 Reference:Site Info.
2. In Archicad, open it from the file menu. Doubleclicking it won't work.

More»

All Entries | 1 | 2 | 3