On Land

Environment Information
At Rill & Decker Architects we run ArchiCAD on Mac OS X. If you work at Rill & Decker, this is your stuff. If you don't, but you work in ArchiCAD, you may find something interesting. Anybody else, I don't know.
RSS
ArchiCAD Archive

« Newer | All Entries | 1 | 2 | 3 | 4 | 5 | 6 | 7 | 8 | Older »

It's slow to open the settings dialog when you can use the info box.

It's slow to choose File -> Save rather than typing Cmd+S.

It's slow to choose File -> Merge rather than typing Opt+M.

It's slow to hunt down the close button at the top of a window rather than typing Cmd+W. However: it's slow to bring a window to the foreground so you can close it, if you can click its close button in the background.

It's starfish-slow to choose Edit -> Copy, choose Options -> Stories -> Go Up A Story, choose Edit -> Paste, rather than holding down Cmd and typing C, 6, V.

It's canyon-formation-slow to choose Tools -> Display Order -> Bring Forward, Tools -> Display Order -> Bring Forward, Tools -> Display Order -> Bring Forward, Tools -> Display Order -> Bring Forward, rather than holding down Ctrl and typing 6, 6, 6, 6.

It's slow to right-click and choose Undo, right-click and choose Undo, right-click and choose Undo, right-click and choose Undo, right-click and choose Undo, rather than holding down Cmd and typing Z, Z, Z, Z, Z.

It's slow to drag windows around until you see the one you want rather than use Exposé.

It's slow to go to Display Options when you can use this.

It's slow to go to the Project Map, scroll to the Details part, right-click on it, and choose New Independent Detail, rather than typing Ctrl+D.

It's slow to right-click and choose Open Section/Elevation, or Last Section/Elevation, but unfortunately we don't have a choice.

The fastest way to cancel anything is to type Esc.

The fastest way to deselect is to type Esc.

The fastest way to remove marquee is to type Esc.

The fastest way to switch to the Arrow is to type Esc. The second fastest way is to type Right Arrow, and that's better a lot of the times because it doesn't require that you have no selection and no marquee.

The fastest way to activate the Marquee tool is to type ` (the key above Tab).

The fastest way to activate the Wall tool is to type 1.

The fastest way to activate the Slab tool is to type 2.

The fastest way to activate the Roof tool is to type 3.

The fastest way to activate the Text tool is to type E.

The fastest way to activate the Fill tool is to type F.

The fastest way to activate the Door or Window tool is to type D or W respectively.

The fastest way to change the reference line side of a wall is to type C.

The fastest way to change the geometry method (box, rotated box, polygon, etc) of any tool is to type G. It's also the fastest way to switch the orientation of the dimension tool.

The fastest way to turn on gravity and choose the gravity element type is to type V.

You can do all those things without moving your left arm. You have to move your left arm a little, but it's still fastest to

...activate the arc tool by typing 0 (zero),

...activate the Object tool by typing (letter) O,

...activate the line tool by typing L,

...activate the Dimension tool by typing /.

...toggle the rotated grid by typing K.

Plenty more where those came from.

There are different ways of doing this, but the first I've been pleased with is the use of Quicksilver.

With Quicksilver running, invoke it (Ctrl+Space, unless you changed it). Type enough of the word "ArchiCAD" to have it pop up on the left. If you have multiple versions, select the proper one from the list below.

Tab. Type "Lau". You should see "Launch Another Copy". Return.

There ya go.

If you don't see the "Launch Another Copy" option, quit Quicksilver, relaunch it, and try again. I have seen this happen after launching another copy, quitting it, and trying to launch again. Seems like a bug.

It isn't needed, but there are times when it's very convenient. You can quickly copy and paste from another project. You can open a placed module without closing the host project. It comes in handy.

Run multiple copies at your own risk. Keep your head on straight. Don't run two all the time. Don't open the same file in two copies at once. Quit the second one when you're done with it. Pay attention to where the second copy is on the dock. All these warnings go double for people who are easily confused, you know who you are.

Another tip: When quitting two ACs, let one quit all the way (the black triangle disappears from the dock) before quitting the other. If you quit them both simultaneously, you're asking for corrupted preferences.

There is a bugfix, they call it a Hotfix, I don't know what that means, update to ArchiCAD. The updater is on the Onion in ArchiCAD Program Files. It's called AC9-1965.

Everyone should run this. You can run it from the Onion, rather than copying it to your machine.

(You can check for updates any time by choosing Check For Updates from the Help menu in ArchiCAD.)

Here is the list of fixes. Most of them don't mean much to me, hopefully some of our (unlisted) issues have been fixed too.

It has been out for several days and no one has complained yet, so it probably does no harm.

Graphisoft's version numbering scheme has become completely ridiculous. Patches like this one should increment the third digit in the version number, making this 9.0.1. But no, they have this quirky "v1, v2" patch numbering deal, but they don't even use that consistently. Sometimes a patch increments the v number, sometimes it adds a "+", and in this case it does nothing, it's still v1. So it's not 9.0.1, it's not 9.0.0 v2, it's not 9.0.0 v1+, it's 9.0.0 v1 Build 1965. You have to know the build number, which should be a really geeky arcane thing, in order to describe the standard current release of the program. Most people outside of software development don't know what a build number is. Ridiculous.

Gravity allows you to "set" elements on top of other elements. Instead of manually setting a Z height, the element will be placed at the top elevation of a slab, roof, or mesh, at the clicked point.

These elements can be placed using gravity: Wall, Column, Beam, Object, Lamp, Level Dimension.

I works in plan and in the 3D window.

You tell ArchiCAD what type of element to set on by using the gravity buttons in the Coordinate Box:


L-R: Off, Slab, Roof, Mesh

You can scroll thru the buttons by typing V.

If more than one of the target element type is present at a given point (e.g., floor, counter, and ceiling slabs), the placed element will be set on top of the topmost element. Elements on stories above will be detected too. In order to get gravity to detect lower elements, you can hide the layers of the elements that are "in the way." (Don't forget the Quick Layers palette.)

Tip: Watch the Z field of the Coordinate Box. It will display the elevation that gravity is using at a given point, so you can see if the element is going to be dropped at the right height.

In practice, I only gravity for a couple of things. It's not convenient to use it to place toilets, for example, since they have to sit on the finish floor, and the toilet usually goes in before the finish floor slab. Since gravity always responds to the topmost target element, it takes some planning and care, and it isn't as natural as it could be.

It's very useful for placing 3D trees on a mesh. No matter where you click, you know the tree is going sit on the mesh, and you don't need to know the height.

It's indispensable for associated Level Dimensions.

Composites allow you to show multiple cut fills in a wall, slab, or roof. I can think of three reasons to use them.

• To display multiple fills. Example: Masonry veneer on a stud wall. This is the most obvious, and probably original, reason to have them. Ironically, such composites don't work at all unless you've made your own windows to handle the masonry openings correctly, which we have.

• To model a wall at one thickness while dimensioning the wall to another. Example: 2x4 with drywall. The wall is 4 1/2" inches thick to match reality, and to properly interact with trim elements. We dimension only the stud portion of the wall. More on the particulars of this below.

• To have elements "break down" nicely when turning a section into a drawing. Example: A joist deck. The deck composite has a skin for sheathing on top of a thick skin of the joist depth. The skins are the same fill, so the slab will appear homogeneous. When the section is unlinked, it's easy to turn the top (sheathing) fill into plywood. Since composites don't have scale-sensitive fills, this is the next best thing.

Composite setup

• Edit composites at Options -> Attribute Settings -> Composites.

• Composites can 'force' skin attributes onto elements. Instead of setting each wall to have particular pens for background color, skin lines, etc., you can set elements to use the attributes defined in the composite. Generally, I think this is a good idea, on the principle that you should control more stuff with fewer clicks. Further,

• There is a special case where you have to use the settings of the composite: To completely hide a skin separator line. This option isn't available in the element settings. For drywall partitions, you have to treat the interior separator lines in this way.

• The background colors, fill pens, contour pens, and separator pens can be applied from the composite independently. If you want a wall to be blue for some reason, you can change the contour (cut) pen while retaining the background color of the composite.

• You can limit the use of a composite to the wall, slab, and/or roof tools.

• For wall composites, the reference line is at the top.

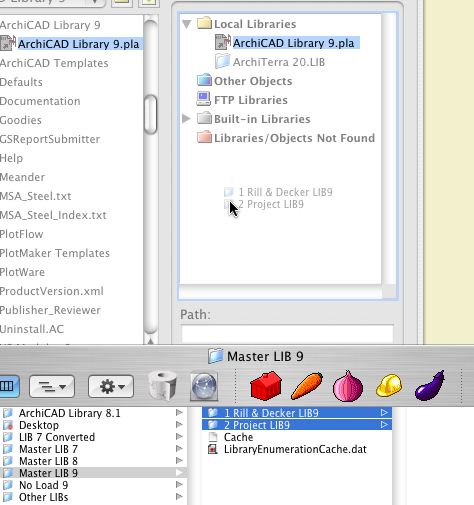
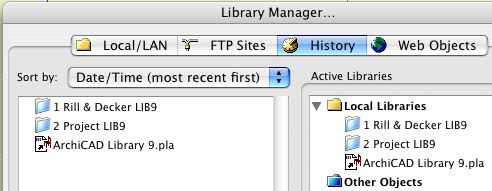
• As with any attribute, you can use Attribute Manager to pull composites from other projects.

Case study, dimensioning stud walls

• In the setup of the composite, the checkboxes on the left allow you to designate skins as "Core". You can have multiple core skins, but they must be adjacent. What's core? Well,

• In the dimension tool settings, there is a checkbox, "Dimension Core Only of Composite Walls." So,

• The composite 'Wall 2x4 DW' has only the 3 1/2" center skin set to core. When dimensioning, click on the edge of the wall. (Don't hunt for corners!) This results in two ticks on the core, not the outside, of the wall. The wall is built at 4 1/2", and dimensions 3 1/2". Perfect.

• Summary of why this composite set up the way it is: It's 4 1/2" inches overall, because that's how thick walls are in real life, and it's impossible to pretend otherwise and still get the trim modeled correctly. It's three skins; 3 1/2" in the middle, set to core, so we can dimension to the framing. The three skins are all the same fill, so the walls clean up to the slabs in section. (The slabs are all the same fill too.) The separator lines are hidden in the composite settings, so the walls clean up to each other in plan.

Click the flyout on the favorites palette and choose "Load Favorites". Navigate to the favorites file you want. We keep general favorites at 3 Resources : Favorites.

If you already have favorites in the list, you will be asked if you want to Merge or Replace the existing favorites. Unfortunately, "Replace" refers to the list as a whole: All the current favorites will be deleted. To overwrite current favorites with those in the new file, while leaving the others alone, you need to choose "Merge." This has its own quirk: When a matching name is found, you will be offered the options "Skip" (don't overwrite), "Skip All" (which cancels all remaining overwrites), and "Overwrite". There is no "Overwrite All", so in order to accept all the incoming favorites, you have to click "Overwrite" however many times. Another D-minus interface element.

Also, I can't stand the word "favorites". It means I have a great subjective, emotional, aesthetic interest in the item, much greater than in most items. "OMG, I loooooove this 2x4 wall!!!" No. They should be called presets.

You can drag and drop libraries to the Library Manager from the Finder.


Like this

Since AC8, objects have had the ability to have nodes that edit parameters other than height and width. In GDL jargon, this functionality is called Graphical Editing. These nodes respond to the stretch command as well as the stretch button of the pet palette. Even though they can do things besides stretch.

Since AC8.1, editing nodes have been diamond-shaped instead of round, so you can tell them from the non-editing ones.

In AC9, they decided that wasn't clear enough, and now editing nodes can have a different color. (Options -> Preferences -> Miscellaneous) The default is green, and I haven't been motivated to change it. When you see a green, diamond-shaped node, try it and see what it does.


Editing a crown miter

While editing with one of these nodes, a palette pops with the name and value of the parameter(s) being edited. (Some nodes edit two parameters at once.) If you type "N", the value in the palette will highlight and you can enter the value directly, just like typing "R".

In Library Manager, the History tab shows the libraries that have been loaded recently (since the last Clear or Clear All). This list is independent of any particular project.

Typically we use the exact same libraries all the time. But there are exceptions; sometimes you need the version 7 library, for example. If you've loaded that library recently, you can add it from the history tab instead of scrolling through the whole Local/LAN tree.

It's also helpful if you take projects home. When you open a project in a different location, the library manager will come up because the servers aren't there and your local ArchiCAD folder path is different. But the history tab remembers the local instances of the libraries, making it easy to load them quickly.


If you load a "wrong" library at some point, you can use the "Clear" button to delete it from the history so you're not tempted by it in the future.

A particularly self-starting member of the ArchiCAD community, Karl Ottenstein, has developed an add-on called QuickDisplay, which allows us to assign keyboard shortcuts to various display options. The commands are toggles, which means you can strike a key turn the Section Depth (e.g.) on, and then strike the same key to turn them off. He has generously allowed this add-on to be used free of charge. Here is the ArchiCAD Talk topic where mad, righteous praise is heaped upon him.

Here is Karl's page with full instructions for the add-on. I will summarize the high points.

Get the file from 3 Resources : Add-Ons. Place it in your local Applications : Graphisoft : ArchiCAD 9 : Add-Ons. Launch or relaunch ArchiCAD.

Your Display menu should now have a QuickDisplay submenu at the end. Here you will see commands for toggling various display options.


QuickDisplay Submenu

Naturally, and I hope obviously, you don't go to this menu to activate the commands. That wouldn't be much of a shortcut would it. The commands have to be on a menu in order to have shortcuts assigned to them.

As you can see, I only have shortcuts assigned to two of the commands, Section Depth and Line Weights, on F4 and F5 respectively. I toggle the others much less and I don't need a shortcut for them. You can do whatever you want.

I have updated the RND Keyboard scheme with these two shortcuts. You can import the updated scheme at Options -> Work Environment. The scheme is located at 3 Resources : Work Environment : RND Profile : Shortcuts.

For information on assigning shortcuts, see the ArchiCAD Reference Guide, page 153, or ask for help.

Well, there's not much to it. While moving from 7 to 8 was so awkward we had to decide if it was worth it, moving from 8 to 9 is so simple it's hardly worth writing down. The only extra step is to import the Work Environment.

You should be able to simply open your 8.1 project in AC9. You should be able to open your PM 3.1 layout book in PM9. If you don't change the name of the project file, the views should update in PM without fanfare.

That said, I wouldn't make the jump the day before the construction set is due. Use common sense.

Just in case, put a copy of the project in your Old Files folder with a modified name. Don't change the name of the working version of the file. If you do, you'll have to relink in PM.

Libraries: Switch your libraries so the following are loaded:

• From the carrot, within Master Library 9, '1 Rill & Decker LIB9' and '2 Project LIB9'.

• 'ArchiCAD Library 9' from your local Applications : Graphisoft : ArchiCAD 9 : ArchiCAD Library 9. (We load the ArchiCAD Library locally because it's faster and it never changes, so there's so synchronization issue.)

Stop using the Master Library 8 entirely. If you are working with a AC7 project that has been brought forward, continue to use the 7 library as you have been.

On the subject of the cache library, there are intermittent issues with it. If it works for you, use it. If not, don't. If you have weirdly missing parts, this is the first thing to check.

For the new Master Library 9, I copied the whole Master Library 8 to start, and I have been updating and replacing some parts along the way. As version 8 parts get superseded, I move them to the 'xOld Objects' folder. This folder loads, so you can keep using the placed parts indefinitely. For new placements, you should use the newer objects in the normal folders. To remind you, the 'xOld Objects' folder is a jumbled mess, making it very hard to find anything. Don't try.

If you have missing or misbehaving Library Parts, it's probably a change that was made in the 8 library that didn't get copied to the 9 library. You should immediately let me know of any issues so we can dispatch them right away.

« Newer | All Entries | 1 | 2 | 3 | 4 | 5 | 6 | 7 | 8 | Older »